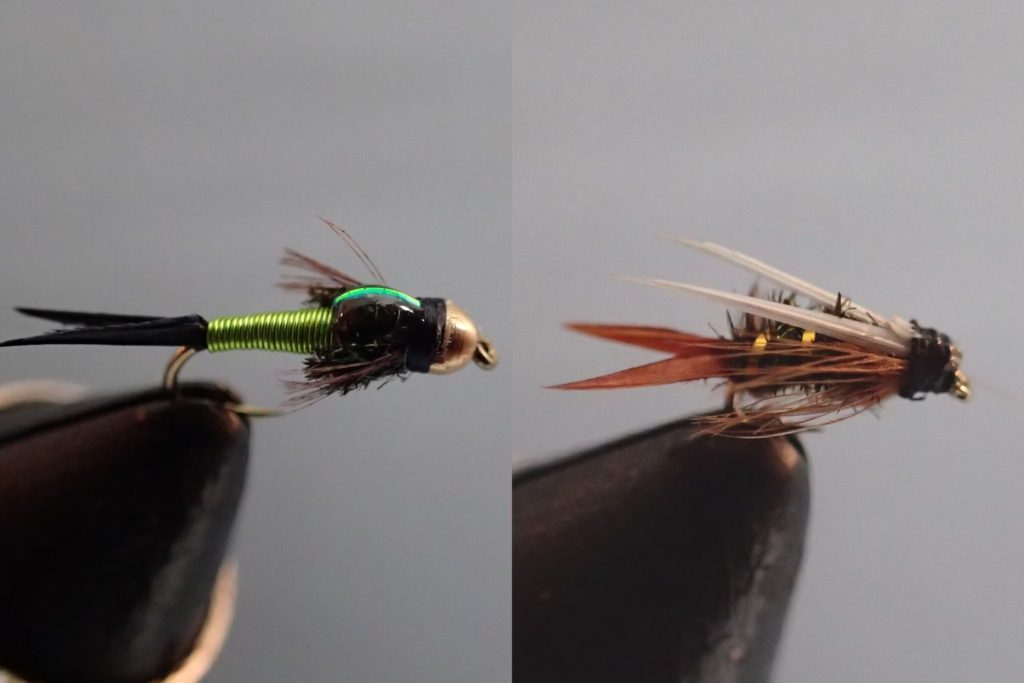
Goose and turkey biots are two of the most commonly used materials in the world of fly tying. From the tail of a Copper John to the wings of a Prince Nymph, and even the antennae on a stonefly, biots are an essential material for fly-tyers around the world. So, what is a biot?
A biot is a sturdy, tapered fiber (or barb), pulled from the wing feather of a goose or turkey. In fly tying, biots can be used to imitate the tail, body, legs, antennae or wings on a number of different fly patterns. Biots are sold in a number of different colors (natural or dyed), but you may choose to harvest your own.
If you are just getting into fly tying, it’s important that you learn how and when to use biots properly. So, stick with me, because for the rest of this article, I am going to cover everything you need to know about goose and turkey biots.
Let’s get started.

Related Content:
- Fly Tying For Beginners (The Ultimate Guide)
- 10 Baetis Nymph Patterns You Need To Try
- 25 Best Dry Flies For Colorado Fly Fishing
- San Juan Worm: Fly Pattern Profile
- Head Cement vs. Super Glue: What’s The Difference?
- What Is An Attractor Fly? (With 10 Examples)
How To Harvest Goose and Turkey Biots
If you have access to the wing feathers of a turkey or a goose, and you don’t want to spend money on pre-prepared biots at a fly shop, you can just harvest your own biots. It’s a fairly straight-forward process.
All you have to do is locate the long, stiff fibers on the feather, and either clip them, or gently pull them from the quill. Just be sure not to crush the fiber’s edges between your fingers.
The only problem with harvesting your own biots, is that you lose the variety in terms of colors that you can get in a fly shop. For instance, if you need bright yellow biots for a particular pattern you are tying, then the natural black biots from a goose feather won’t do you much good. Sure, you can dye them yourself, but with so many options readily available (and for such a low price) it really just makes sense to purchase them.
Plus, a single strip of biots purchased from a fly shop will last you a super long time.
How To Use Biots In Fly Tying
As I mentioned, biots can be used in a number of different ways when you are tying flies. The most common uses for biots are tails and wing casings (as seen on a Prince Nymph), but you can also use them for the body or antennae of a fly pattern.

In this next section, I am going to dive a little deeper into the different uses for biots.
Soaking Biots
One of the best tips I can give you when it comes to tying flies with biots, is to soak your biots between 2 wet paper towels. Stiff biots, especially when using them as a body wrap, can be very brittle and difficult to work with.
Additionally, biots tend to kink a lot easier when they are completely dry. And I can tell you that fish will be much less attracted to a fly with a bent tail.
So, save yourself some trouble and let your biots soak for awhile before you go to use them. You will have a much more enjoyable experience if you do so.
Using Biots For Tails
When you pull biots off a quill, they have a natural curve to them. And this curve is what makes them such a good option for tails in fly tying. However, there are a number of different ways to use biots, and they can be kind of tricky to tie if you don’t have much practice. So, here is a quick little guide to help you tie tails with biots.

Outward Curve
By far, the most common way to use biots as a tail is to tie them so that they curve outward from the sides of the fly. To do this, just peel of clip two neighboring biots from a quill. Then, take the upper biot, flip it around, and place it back-to-back with the lower biot.
At this point, the two biots should be curving away from each other.
Now, align the tips of the biots so that they are even, and pinch the biots between your thumb and index finger on your non-dominant hand (the opposite of your thread wrapping hand). You should leave the thicker half of the biots exposed beyond your finger tips.
Then, straddle the hook shank with the 2 butt ends of the biots, and gently secure them to the hook with your body thread. And there you have it — two outward-facing biots that closely resemble a two-pronged tail.
Upward Curve
When tying slightly larger flies, you might choose to have the tail curve upward. To do so, once again, just clip 2 adjacent biots from your quill, and lay them on the palm of your dominant hand so that the biots curve up towards the sky.

Then, cross one of the biots over the other so that they splay away from one another.
Now, pinch the biots between your index finger and thumb on your non-dominant hand, lay the cross-section of the biots near the hook shank, and secure them with thread.
Side Note: Wrapping upward curved biots can be tricky, because the biots will want to fall off the back of the hook as you wrap them, so just be patient and take your time.
Wings (Or Wing Casings)
Many flies will use biots to imitate the wings of a fly. A great example of this is the Prince Nymph.
To do this, you should clip or peel two biots from your quill, and lay them flat in the palm of your dominant hand so that the tips curve down into your palm. Then, splay the tips outward, and secure the cross-section of the biots to the top of your fly.


I like to run a couple thread wraps above and below the biots to make sure they are nice and secure.
Antennae
Tying the anennae of a fly is very similar to tying a biot tail. The only difference is that you tie them to the front of the hook. You may choose to curve them upward, outward, or downward, but just be sure you don’t cover the eye of the hook.
Body
Goose biots tend to work a little better than turkey biots when used for the body of a fly. Just be sure to soak them. Brittle biots just won’t work well when wrapping the body of a fly.
The cool thing about using biots for the body of a fly, is that you can create smooth, or segmented bodies. It all just depends on the orientation of the biot when you secure it to the hook. Let’s start with the segmented body.
If you look closely at a biot, you will notice that it has a slight curve from one edge to the other. Now, if you want to create a segmented body with your biot, you need to tie the tip of the biot to the shank of your hook with those ridges pointing upward. This can be a great look for all sorts of nymphs and emergers.
On the other hand, if you want a smoother look, you can just secure the biot to your hook with the ridges facing down (sort of hugging the hook). This will hide the ridges and keep your body from looking segmented.
It’s a good idea to practice both techniques, but I tend to tie segmented bodies more often than smooth.
Final Thoughts
Some of the most popular fly patterns known to man make use of biots. For instance, Prince Nymphs use biots to imitate wing casings on their back. Copper Johns use biots to imitate a strong, sturdy tail. Stonefly Nymphs will often utilize biots to imitate both their tail and antennae.
In other words, biots are a common and essential part of fly tying. So, it is critical that you know what they are, and learn how to work with them.
Hopefully this article has provided you with enough know-how to incorporate them into your own fly patterns.