Do you want to learn how to tie flies? You are in the right place. In this guide to fly tying for beginners, I’m going to cover everything you need to know to get started.
By the end of this article, you will not only know which materials and tools you need to buy, but you’ll also walk away having tied your first three fly patterns. So, if you’re ready to start tying flies, let’s dive right in.
Disclaimer: This post may contain affiliate links, meaning we will receive a small commission (at no cost to you) if you click through and make a purchase.Why Learn To Tie Flies?
One of the hardest aspects of the avid angler’s lifestyle is all the time you don’t get to spend on the water. Between work, winter, and life, the days you actually get to spend casting a fly rod can be few and far between. So, what are you supposed to do? Well, tying flies is a great way to supplement your fly fishing hobby. It allows you to feed your passion when a day on the water just isn’t in the cards.
Beyond that, if you really get into it, it is a great way to restock your fly box without having to spend a ton of money. Sure, fly tying might have the upfront cost of tools and materials, but over time, once you have a good assortment of supplies, it can save you a ton of money.
Additionally, fly tying is an art. And just as people get into painting, woodworking, or photography, fly tying has a way of capturing your soul, and feeding your creative side. Who wouldn’t want that?
Is Fly Tying Hard?
Yes, fly tying can be difficult. Like any new hobby, when learning how to tie flies, some techniques will come easy to you, while others will require time and dedication to learn. The key is to avoid frustration and focus on the process. If you commit to learning difficult techniques, and sticking with it, fly tying gets easier and easier.
Related Content:
- San Juan Worm: Fly Pattern Profile
- Head Cement vs. Super Glue: What’s The Difference?
- Fly Fishing Gear For Beginners – Here’s What You Need
- What is A Biot? Tying Flies With Goose And Turkey Biots
- 10 Baetis Nymph Patterns You Need To Try
- 21 Common Fly Fishing Mistakes To Avoid
- Is Fly Fishing Hard To Learn? (The Truth)
- 25 Proven Tips To Catch More Trout
Getting Started: Basic Fly Tying Tools
Before you can start tying flies, you are going to need some tools. And if you aren’t careful, this first step can get pretty overwhelming and expensive. So, with that in mind, I want to make something perfectly clear: you do not need to buy every fly tying tool ever invented. When you’re first starting out, there are a few tools you absolutely need, and all sorts of other tools that you just plain don’t.
So, before you hop in the car and drive to your local fly shop, or spend a butt-load of money on Amazon, let me walk you through the essentials. Here’s what you’re going to need.
Rotary Vise
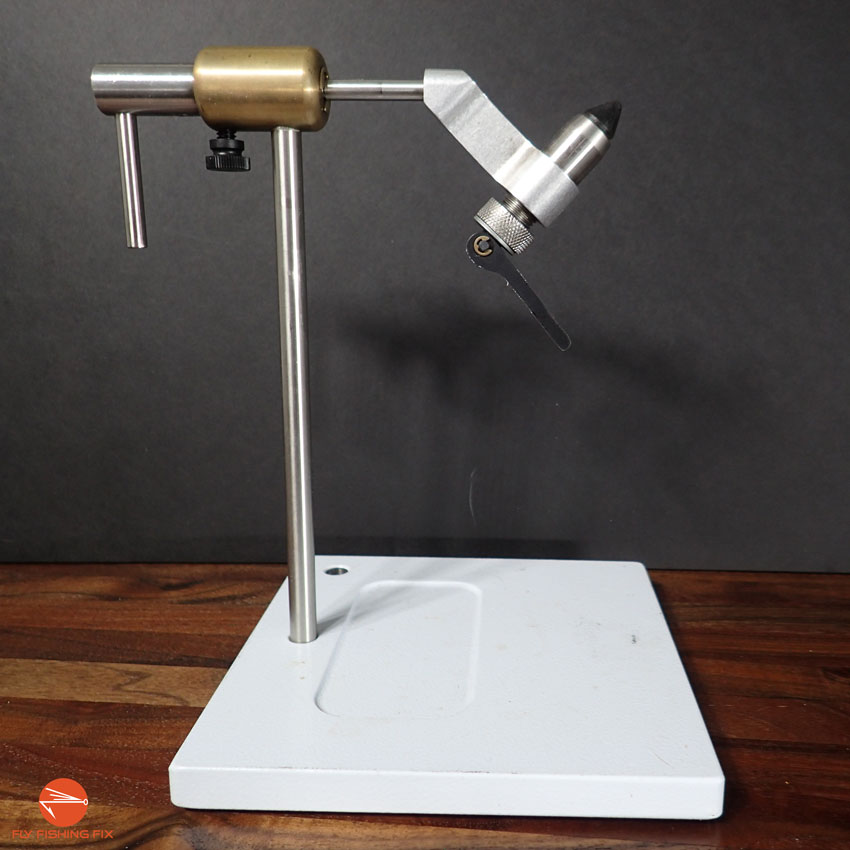
Of all the tools on this list, a vise is something worth spending a little extra in order to get high-quality. When I was first starting out, I had a crappy little vise that struggled to do the one job I needed it to do: hold the hook in place.
Let me tell you, there’s nothing more frustrating when you’re first learning to tie flies, than getting close to the end of a fly that you’ve worked hard to tie, only to have your fly pop out of your vise.
Now, if you are serious about learning to tie flies, then I recommend spending a little extra on a quality vise. You’ll end up upgrading anyway, so you might as well buy it nice, or buy it twice. On the other hand, if you just want to dip a toe into fly tying, and see if it’s something you enjoy, then it’s perfectly acceptable to go cheap on this purchase. Just remember, you get what you pay for.
Additionally, I highly recommend you get a rotary vise. The further you get into fly tying, the more you will value the ability to rotate your fly.
Also, I recommend purchasing a vise with a pedestal base. While some people might love a vise that clamps to the edge of a table, I’m not a huge fan.
First of all, if your vise is clamped to the edge of your work surface, then every time you drop something — which I do a lot — it either falls into your lap, or onto the floor. Trust me when I tell you there’s nothing like searching for a size 24 hook in shag carpet to make you wish you bought a vise with a pedestal base.
Second of all, I like the freedom that comes with a pedestal base. I personally like to set my vise a few inches in from the edge of the table when I’m tying, and a clamp-on vise just doesn’t allow that flexibility.
There are a lot of vises out there, and selecting one can get a little overwhelming. So, if you want my recommendation, I suggest getting the Peak Rotary Fly-Tying Vise – With Pedestal Base. At the time of writing this article, you can buy this vise for $154.99 at Cabelas.
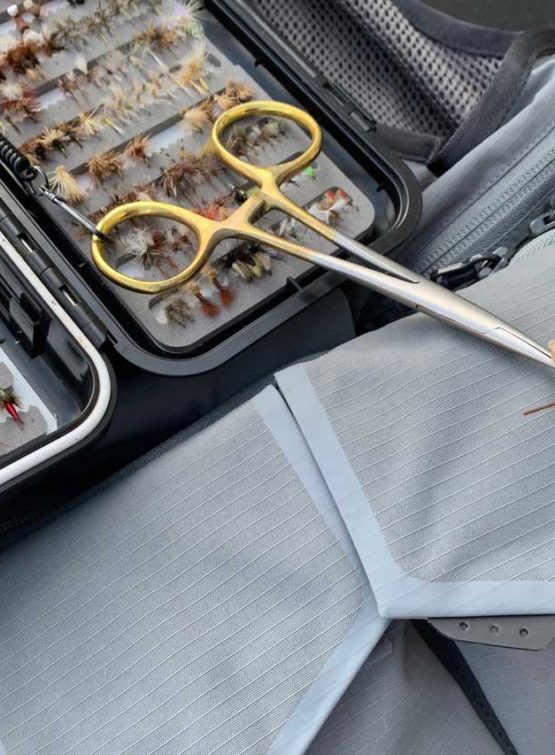
Fly Tying Scissors
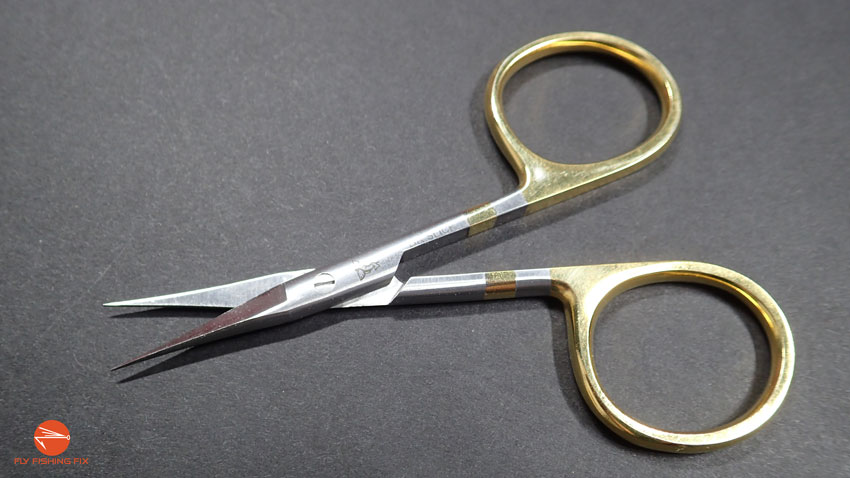
High-quality fly tying scissors are worth the extra money. You see, fly tying requires a ton of accurate, up-close trimming and if you’re using scissors that are either dull, or don’t come to a nice defined point, then you are in for some frustration.
I actually recommend getting a couple different pairs of scissors for different situations. For instance, when you’re tying a lot of small flies (size 18 or smaller) then scissors with a fine, or very-fine tip work the best.
On the other hand, when you are tying bigger flies, a standard pair of scissors is nice to have.
If you are looking for high-quality scissors, then I recommend either Loon, or Dr. Slick. I have included links to my recommended scissors below, so I will let you decide.
Recommended Fly Tying Scissors:
Bobbin

As a fly-tyer, you are going to spend a lot of time working with thread. You are going to be wrapping it, trimming it, and whip finishing it (more on that later) all day long. And in order to do any of that, you will need a bobbin to hold your thread while you wrap it.

I highly recommend getting at least two or three of these. The good news is, bobbins are pretty cheap, and you don’t need to go super high-quality on these. In fact, after over a decade of fly tying, I still use the first bobbin I ever bought that cost me a total of about $7.
Recommended Bobbin:
Bobbin Threader
A bobbin threader is basically just a tool you use to feed the thread through the thin tube on your bobbin. It is a super-simple contraption, and it will make your life as a fly-tyer much more convenient.
Recommended Bobbin Threader:
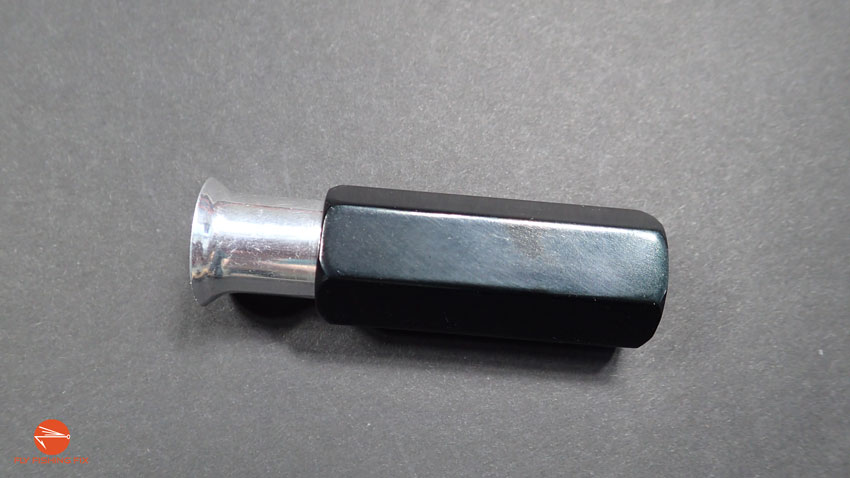
Whip Finisher
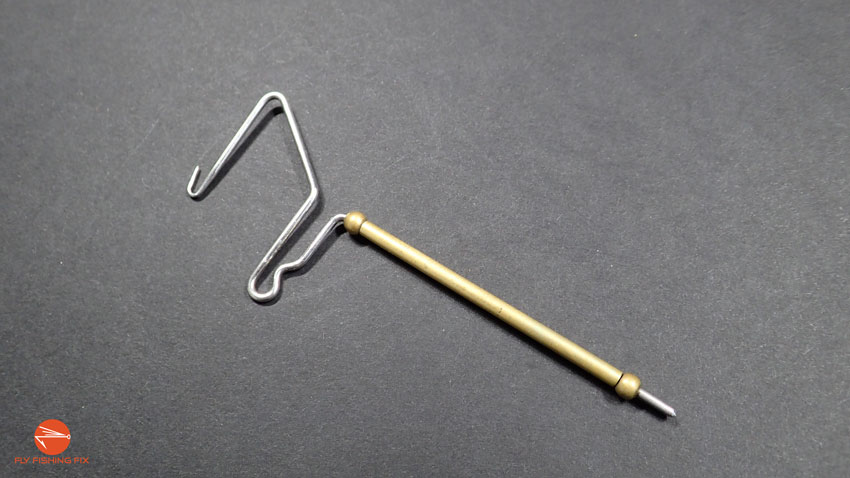
Every time you finish tying a fly, you will use a whip finisher to secure your thread to the hook before you cut it off. In other words, it is the tool you will use to tie the final knot on your fly patterns. This is an absolute essential if you want to get in the fly tying game, and the sooner you learn to use one, the better off you’ll be.
We will get into whip finishing later on in this post, but for now, just know that you need to buy one.
Recommended Whip Finishers:
Bodkin Needle
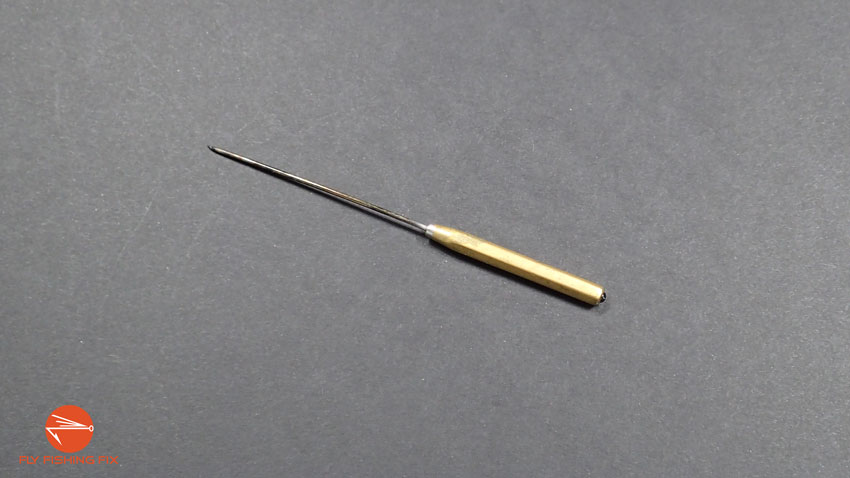
The Bodkin needle is used for all sorts of things in fly tying. From accurately applying head cement, to pulling threads and hackle fibers that got caught up in your thread or other materials, it is an indispensable tool in your fly tying tool lineup.
Recommended Bodkin Needle:
Hackle Pliers

Incorporating hackle into your fly patterns is one of the foundational techniques in fly tying. And hackle pliers make that job a lot easier. You see, hackle is not the easiest thing to grasp when you are wrapping it around a tiny hook. Just try doing it once, and you will know what I’m talking about.
Hackle pliers, allow you to firmly, hold onto any short, delicate fly tying material and wrap it around your hook without any trouble.
Recommended Hackle Pliers:
Hair Stacker
A hair stacker is just a tool that allows you to quickly align the tips of different material like deer or elk hair. It is another simple fly tying tool, but it will seriously improve the quality of your fly patterns.
Recommended Hair Stacker:
Fly Tying Tools Kit
If you want to simplify the process of buying all your new fly tying tools, then you should consider buying an all-encompassing tool set. There are quite a few options out there, but my favorite is the Loon Outdoors Core Fly Tying Tools Set. This set comes with every tool in this list (other than a vise), and the tools are high-quality, so they will last you a really long time.
Basic Fly Tying Materials
Ok, so we’ve talked about the essential tools, but they won’t do you much good if you don’t have some actual fly tying materials to play with. In this section, I want to give you a brief overview of some common fly tying materials you should have on-hand.
Now, this is in no way a comprehensive list. The items I have included are the basics, and will allow you to tie all sorts of patterns. With that in mind, if you have specific fly patterns you want to learn how to tie, you can just look up their respective fly pattern recipes and order the necessary materials. But, for now, let’s dive into some basic fly tying materials.
Hooks
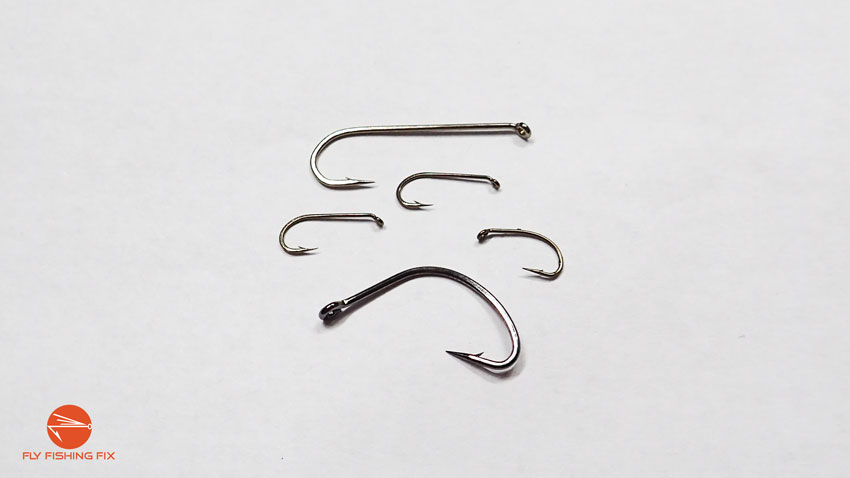
When you’re new to fly tying, it’s easy to get a little overwhelmed by the wide array of hook options out there. Between streamer hooks, scud hooks, nymph hooks, dry fly hooks, and so many more, you might just find yourself stuck in analysis paralysis. So, I recommend keeping it simple.
When you’re starting out, you’re probably going to be tying basic nymphs, dries, and a bunch of San Juan Worms. So, if you equip yourself with some: size 16 nymph hooks, size 14 dry fly hooks, and size 10 2X heavy curved nymph hooks for San Juan Worms, you will be good to go.
Side Note: I recommend sticking with slightly larger hooks at the beginning of your fly tying journey. Learning to tie flies is hard enough as it is. Don’t subject yourself to the added frustration of tiny hooks.
Thread
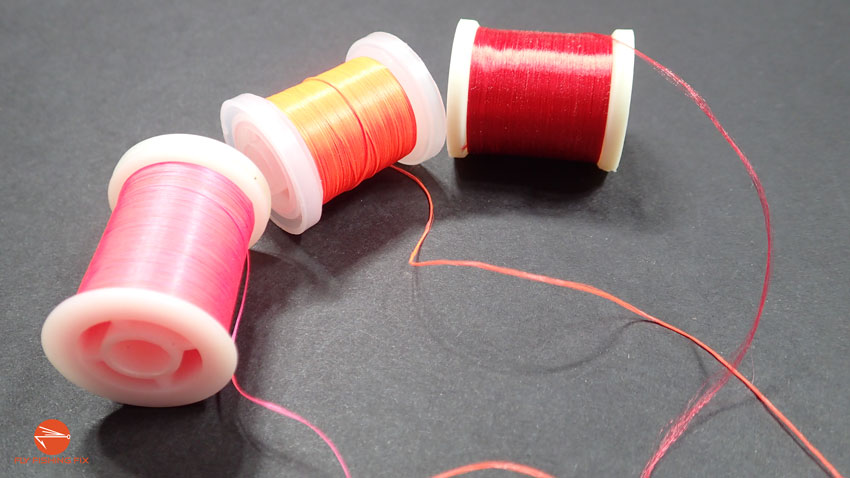
Following closely behind hooks, thread is the second most important material in fly tying. In fact, if all you had in the way of fly tying material was a hook and some thread, I’m confident you could tie flies that stand a good chance of catching fish.
The best part about thread is that it’s super cheap. So, if you want to go out and buy every color under the sun, go for it. You will probably use it at some point.
If you want to take a more conservative approach, however, I recommend buying a spool of 6/0 and 8/0 UNI-Thread in the following colors: black, red, brown, olive, white, grey, orange and tan. This assortment will be enough to keep you busy for a while.
Recommended Thread:
Ultra-Chenille
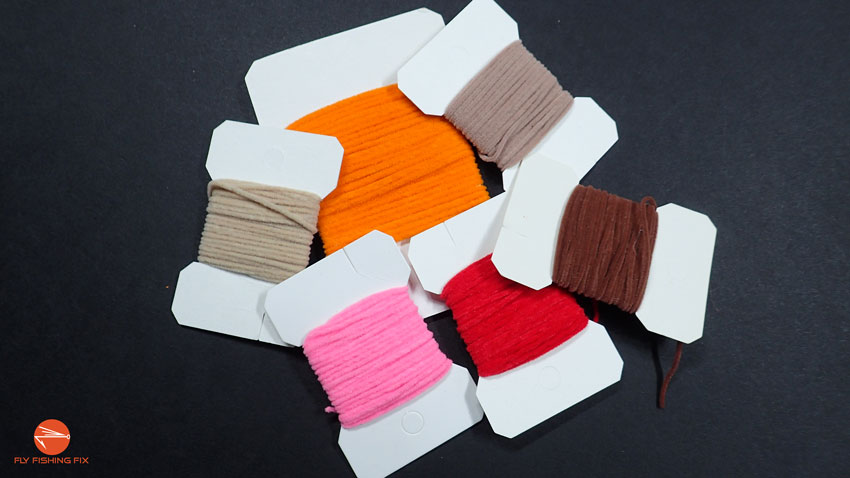
Since the San Juan Worm is the go-to fly pattern for beginners, Ultra-Chenille is another foundational fly tying material. Seriously, you are probably going to tie hundreds, or even thousands of San Juan Worms, and other patterns that incorporate ultra-chennille, so you should keep a nice big stock of it.
I suggest buying chenille in red, brown, tan, orange, pink, and purple.
Recommended Ultra-Chenille:
Head Cement
Head cement is essential if you want your flies to survive the fight of more than one fish, or about 20 fish-less casts. Head cement is basically just fly tying glue that you can use to reinforce the thread wraps, and the whip-finish on your fly patterns.
I recommend Loon Outdoors head cement, which you can buy online through the link below, or at just about any fly shop.
Recommended Head Cement:
Dubbing


Dubbing can be a mix of natural fur, or synthetic fibers, and it is used to imitate the thorax or abdomen on the majority of fly patterns. You do so by wrapping it around your thread, and wrapping it around the hook.
Like thread, you should have a nice selection of dubbing on hand, so I recommend buying it in grey, black, olive and brown to start. Also, you should get dubbing meant for dry fly patterns, and dubbing intended for nymphs.
Recommended Dubbing:
Hackle
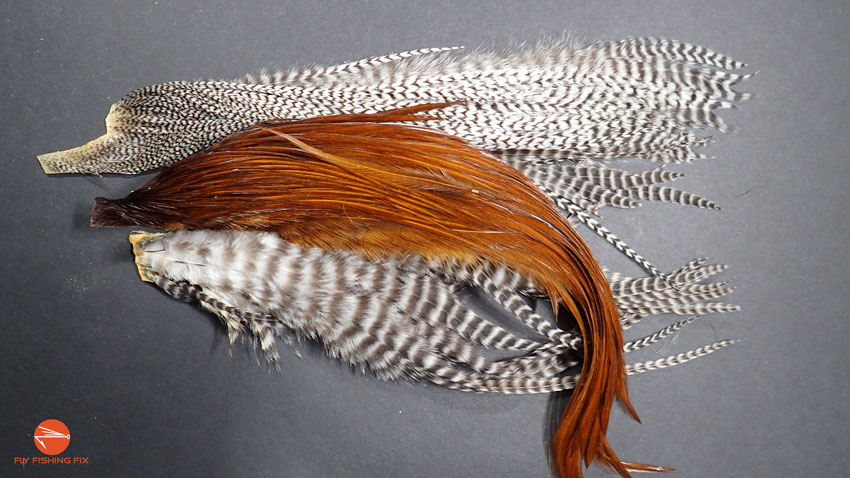
Hackle is used to imitate legs and wings on many different fly patterns, and it is another foundational element of fly tying. With so many hackle options out there, I suggest buying a nice variety of colors. To start, you should get hackle in grey, black and brown.
Recommended Hackle:
Peacock Herl
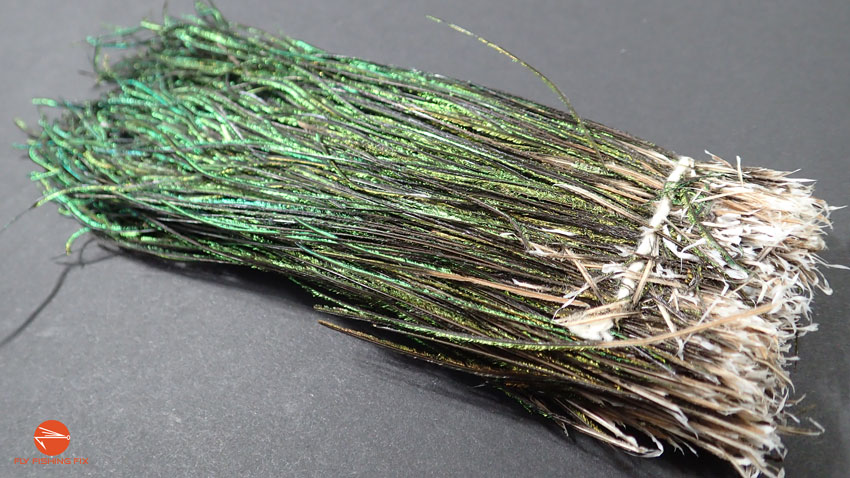
Peacock herl is extremely versatile, which is why so many fly patterns employ it. This is one of my favorite fly tying materials, and at only a couple bucks for a nice big pack of it, you should definitely include it in your beginner fly tying shopping list.
Recommended Peacock Herl:
Elk Or Deer Hair
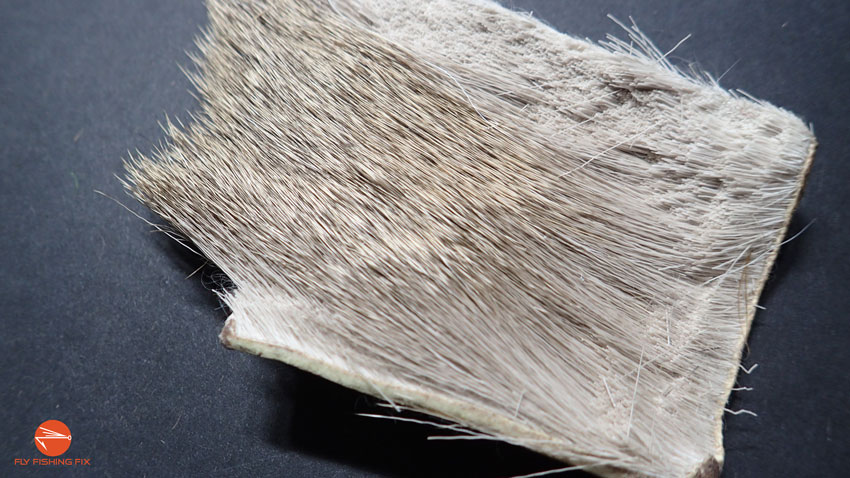
Of all the popular fly patterns in fly fishing, the Elk Hair Caddis is among the best. Beyond that, fly patterns like the Stimulator, Yellow Sally, Royal Humpy, and the Irresistible employ these foundational fly tying materials. So, if you’re going to get into fly tying, you should stock-up on a good amount of elk or deer hair.
I suggest buying both natural and bleached, but if you have to pick one, I’d go with bleached.
Recommended Elk and Deer Hair:
CDC
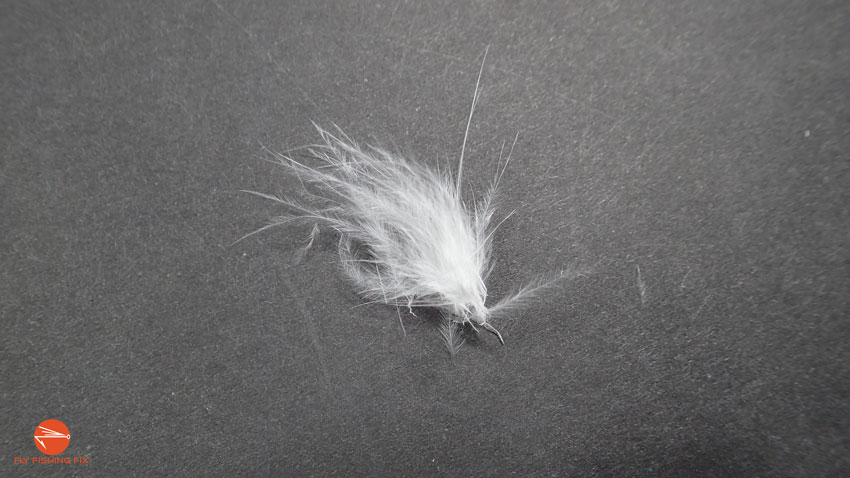
CDC stands for Cul de Canard, and they are the feathers from a duck’s back. They are extremely buoyant, which makes them a great material for the wings on dry flies and emergers.
When you’re just starting out, I suggest buying CDC in white and grey.
Recommended CDC:
Goose Biots (White, Brown and Black)
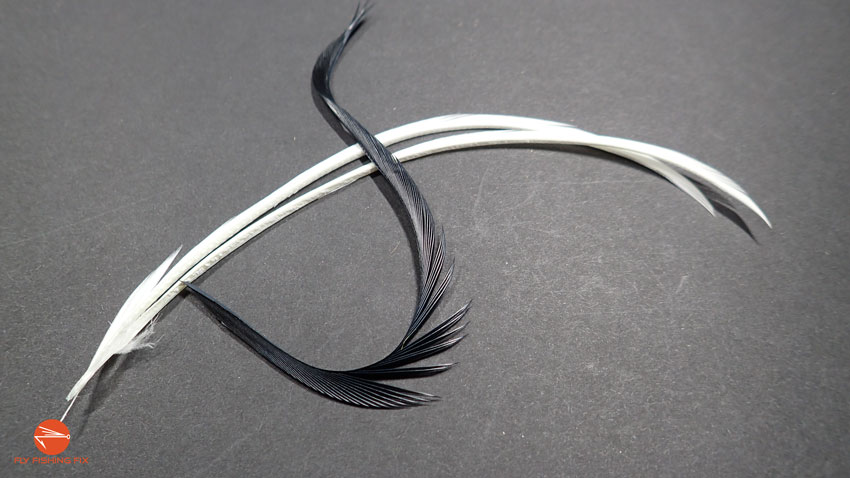
Goose biots are used to imitate wings, legs, and antennae on all sorts of fly patterns. Some of the more popular patterns that use biots are the Prince Nymph (biot wings and tail), Stonefly Nymph (tail and antennae), and the Copper John (biot tail).
Biots are a great fly tying material to keep around, and I suggest buying them in white, black and brown.
Recommended Goose Biots:
Bead Heads
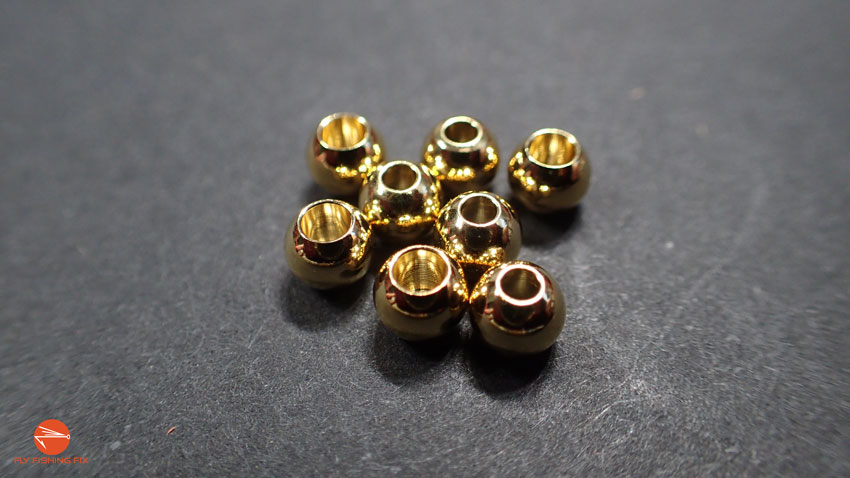
Bead heads are another essential fly tying material to keep on hand, especially if you do a lot of nymphing or dry-dropper fishing. And, since so many different fly patterns employ bead heads, you should have a nice assortment of sizes. At minimum, I recommend purchasing brass beads in the following sizes: 3/32”, 5/64”, and 1/16”.
Important Note: Bead sizing is extremely important, because if your bead is too big, it won’t fit around the bend of your hook. For more on bead head sizing, see the chart below.
Hook Size Bead Size (inches) Bead Size (mm)
18 - 24 1/16" 1.6
16 - 18 5/64" 2.0
14 - 16 3/32" 2.4
12 - 16 7/64" 2.8
10 - 14 1/8" 3.2
6 - 10 5/32" 4.0
4 - 8 3/16" 4.8
Flashabou (Or Flat Tinsel)
Flashabou is one of my all-time favorite fly tying materials; probably because I seem to have most of my fishing success on flies that incorporate it. Some of the most well-known fly patterns that use flashabou are the Copper John, Rainbow Warrior, Flashback Pheasant Tail, and the JuJu Baetis.
It’s a good idea to have multiple colors of flashabou so buying a value pack is a good way to go. However, if you want to start with just one color, then I recommend getting a spool of pearl flat tinsel. (You should know that flashabou and flat tinsel are basically the same thing)
Below, you will find my recommended flashabou value pack, as well as my pearl flat tinsel recommendation.
Recommended Flashabou:
Microfibetts (Mayfly Tails)

I am a big fan of microfibetts, because they make for great tails and antennae on emergers and mayflies. It’s hard to beat the sleek, realistic look of microfibetts, so you should buy a pack in white, and black.
Recommended Microfibetts:
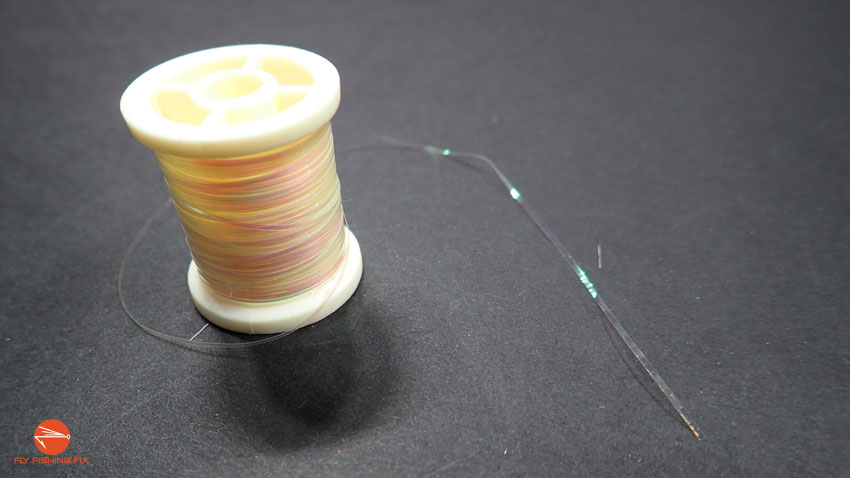
Colored Wire
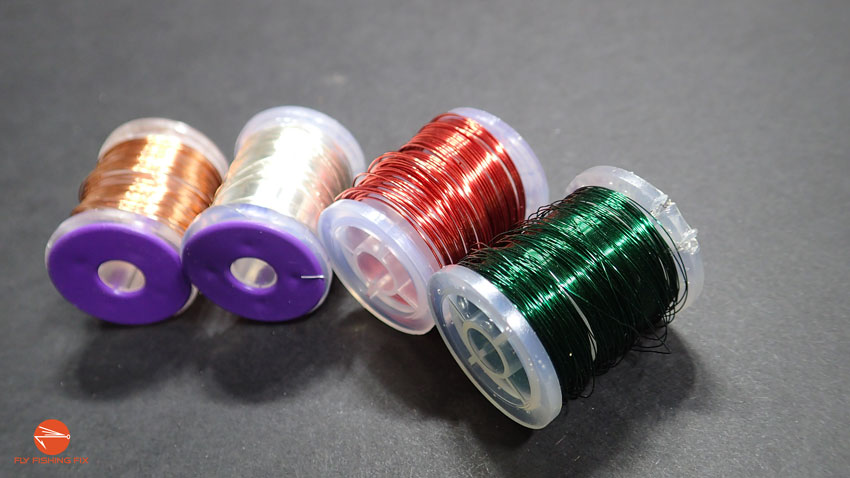
Colored Wire is another important fly tying material to have around. Kind of like thread, you should have a nice selection of colors. Starting off, you should buy colored wire in copper, olive, chartreuse, red, gold, silver and black.
Colored Wire Recommendation:
Lead Wire
If you do a lot of nymphing, then lead wire should be on your shopping list. In many fly patterns, you will want to wrap lead wire around the hook, under your thread, to add a little weight to the fly. This will help it sink faster, which can be great for deep rivers, and whenever you are fishing a dry-dropper rig.
It’s a good idea to have lead wire in a variety of sizes, but starting out, I recommend buying it in the smallest available size — typically .010”.

Recommended Lead Wire
Fly Tying Kits For Beginners
If you are just looking to dip your toe into fly tying, and test the waters, then a fly tying kit can be a great option. Beginner kits will typically come with a starter vise, as well as all the tools and materials you will need to start tying your first flies.
If you choose to go this route, then I recommend the Scientific Anglers Fly Tying Kit. If you really get into fly tying, you will probably end up replacing a few of the tools in this kit (especially the vise), but it’s a great place to start.
Basic Fly Tying Techniques
Now that you’re all loaded up on fly tying tools and materials — yet, before you start tying actual fly patterns — I want to cover a few fundamental fly tying techniques.
You see, in most cases, no matter what materials you are working with, the techniques you will use to attach your material to the hook will be the same. So, essentially, the better you get at these techniques, the more flies you’ll be able to tie.
Side Note: I highly recommend you practice these techniques a few times on a blank hook before you try to attempt them on an actual fly pattern. Forewarning, a couple of these techniques may take you a few tries in order to learn, so it’s best not to risk unraveling all the hard work you’ve put into a fly pattern. It’s best to learn the techniques first, then move on to tying patterns.
Starting and Securing The Thread
The first material you need to secure to your hook when you start tying a fly, is your thread. Since you will use the thread to attach just about every other material, it’s critical that you do this properly. The following steps will walk you through the process.
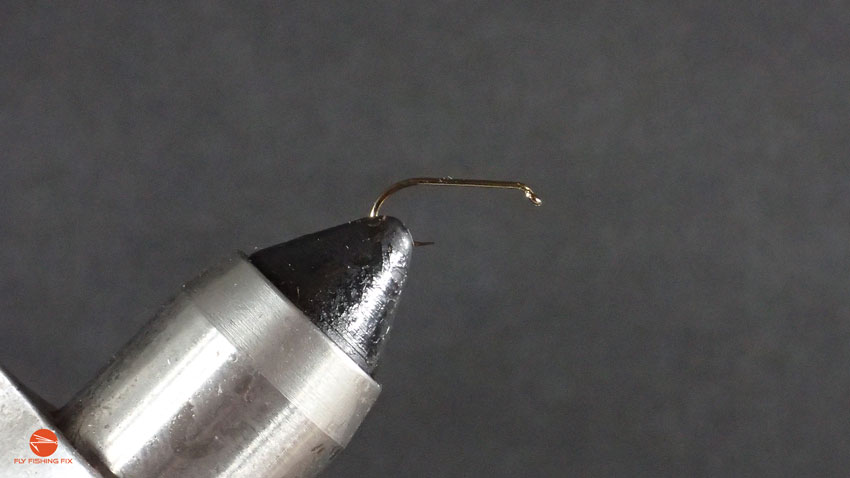
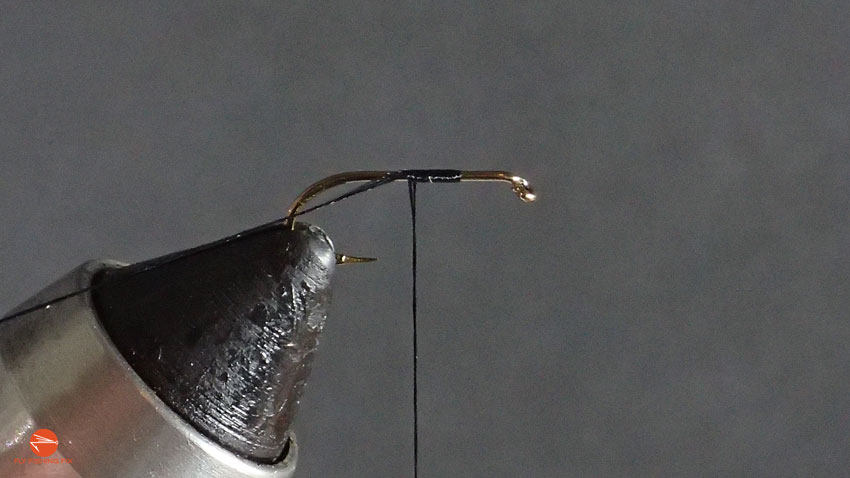
Step 1: To start your thread, hold your bobbin in your dominant hand (i.e. your tying hand), and the end of your thread in the other. Then, starting from the middle of the hook, make a few wraps up toward the eye of the hook.
Step 2: While holding the tag end of your thread tight, wrap your thread back over your initial wraps. This will secure your thread in place.
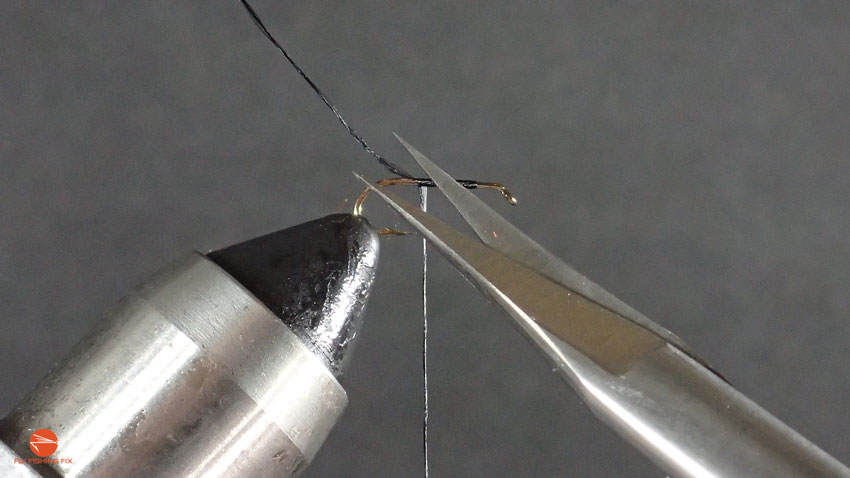
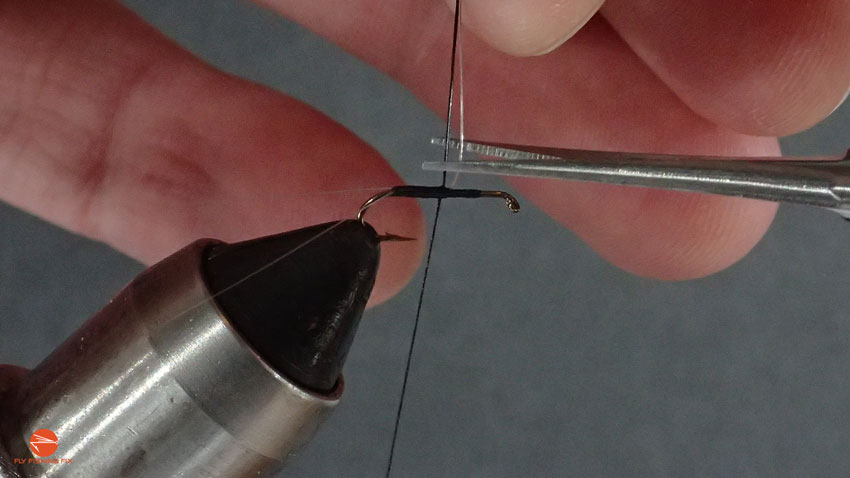
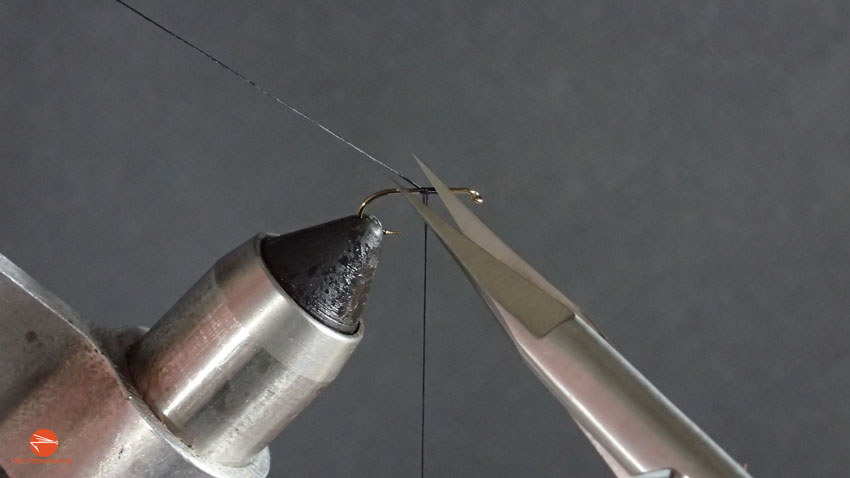
Step 3: Using your scissors, cut the tag end of your thread.
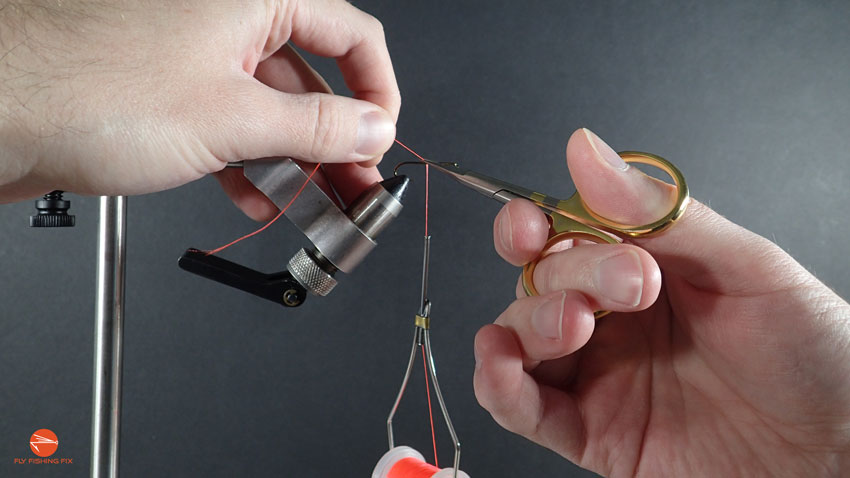
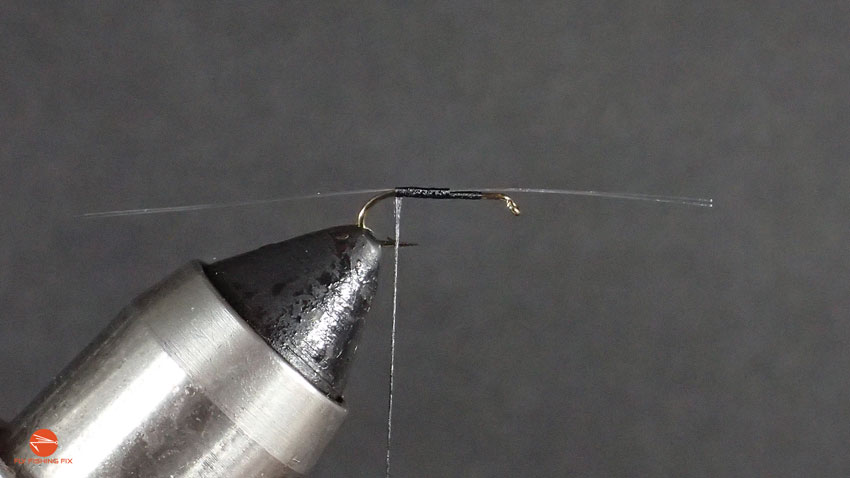
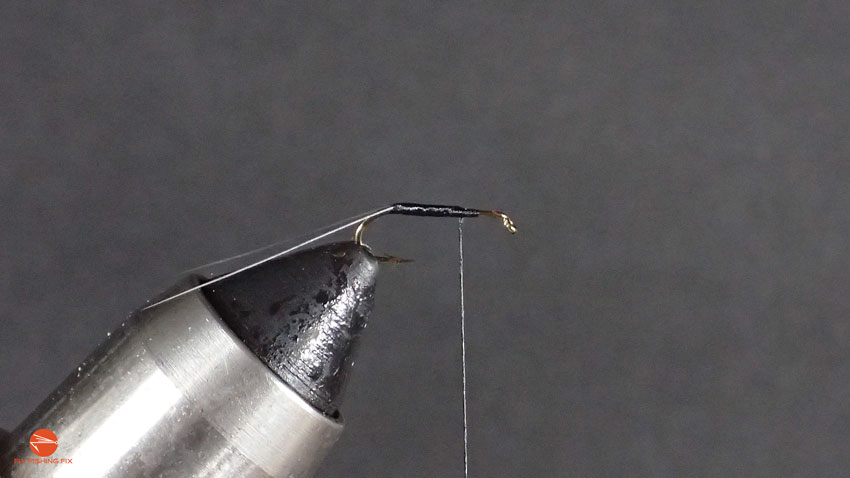
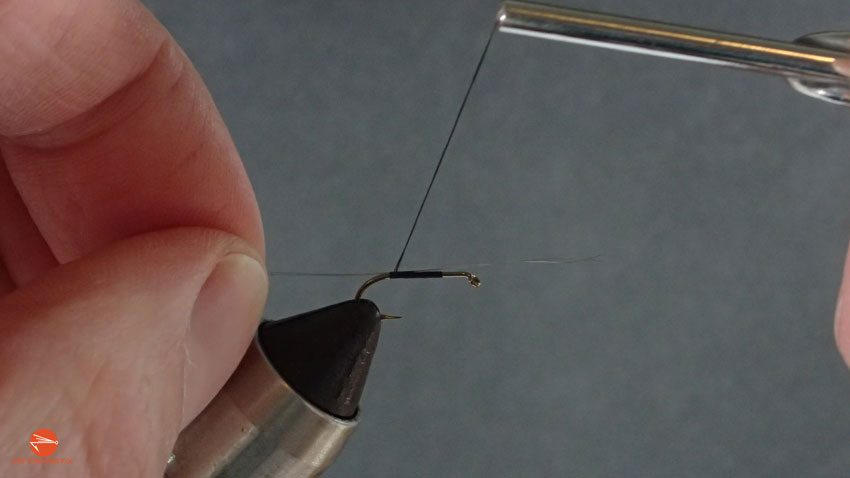
Step 4: Make a couple final wraps past the freshly cut end of your thread. At this point, on many fly patterns, you will continue to wrap your thread back to the bend in the hook, in order to cover the entire hook shank with thread.
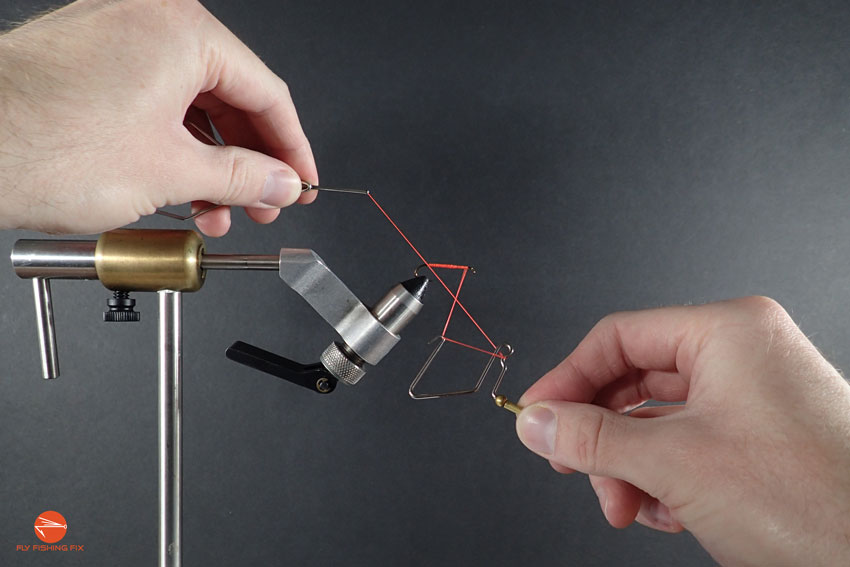
Whip Finishing
As I mentioned earlier in this guide, whip finishing is the technique used to tie-off your final thread wraps, so that you can cut your thread without it unraveling.
Of all the basic fly tying techniques, whip finishing is one of the hardest to learn as a beginner. So, don’t feel bad if it takes you quite a few tries to get the hang of it. Just work your way through the following steps, and take your time. I promise, if you practice it enough, it will become second-nature to you.
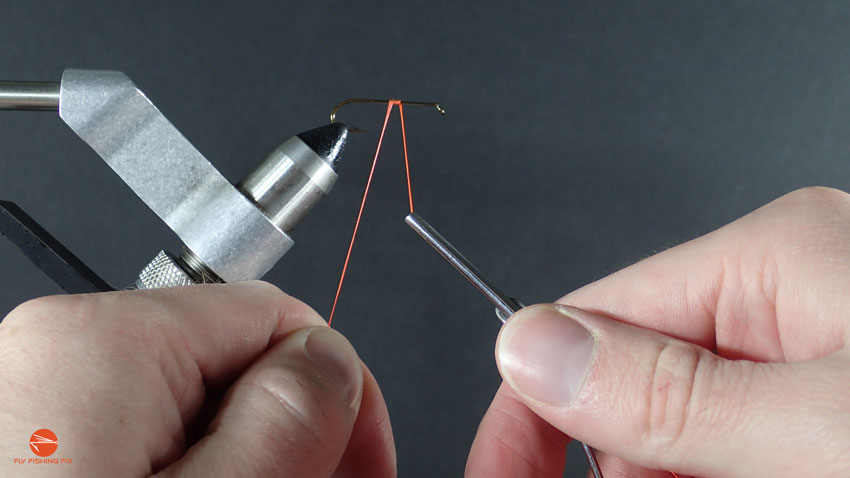
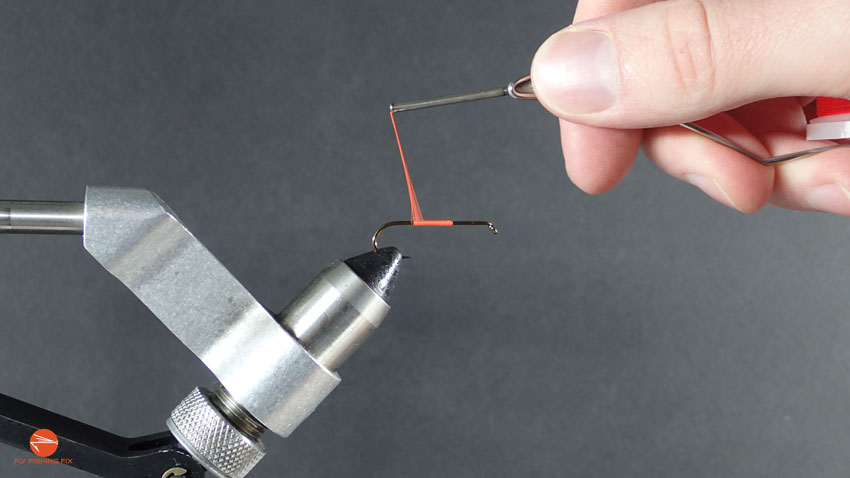
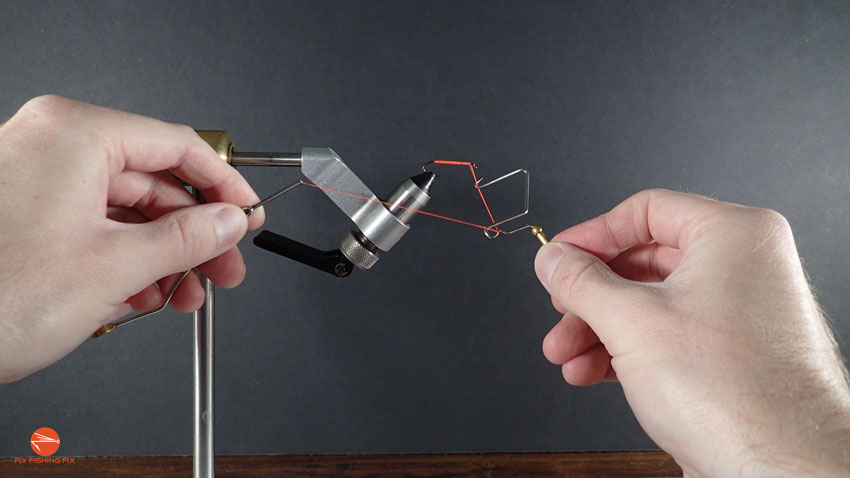
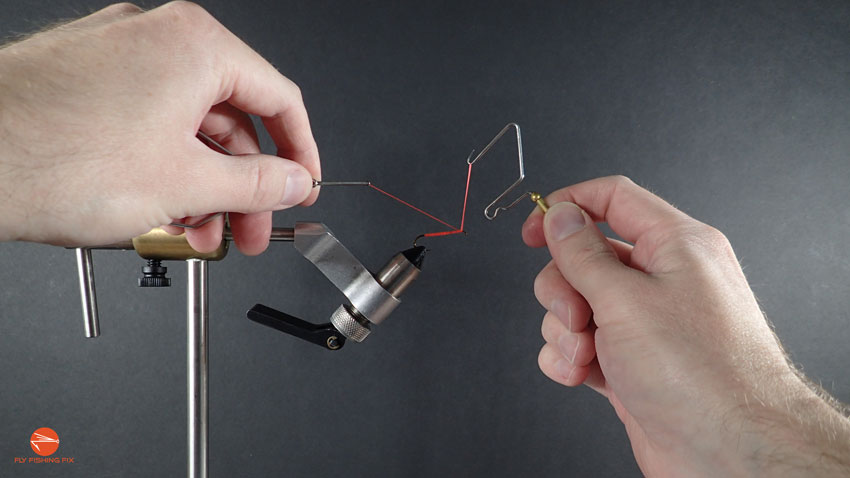
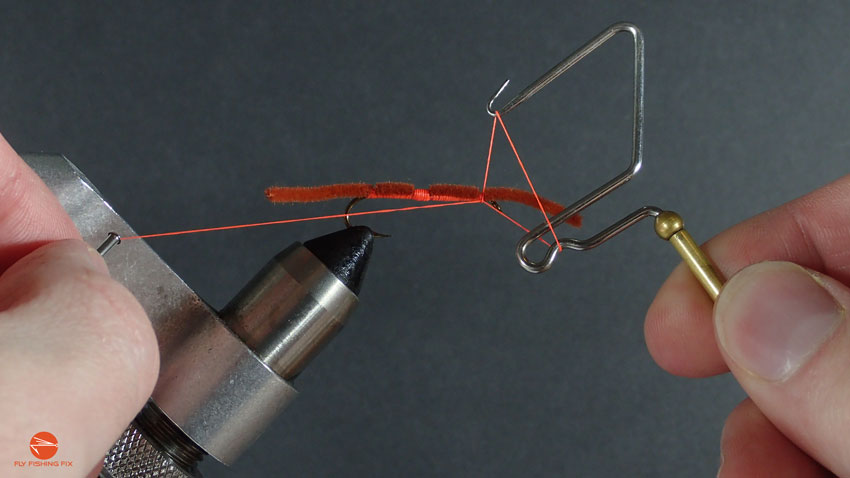
Step 1: To start your whip finish, you’ll want about 8 inches of thread extended from your bobin. Now, hold your bobbin in your non-dominant hand, and your whip finisher in the other. While holding the whip finisher by the handle, use your thumb and index finger to grab the top section and keep it from spinning.
Step 2: While still keeping your Whip Finisher from spinning, push the hook end of your Whip Finisher onto the thread, underneath your fly.
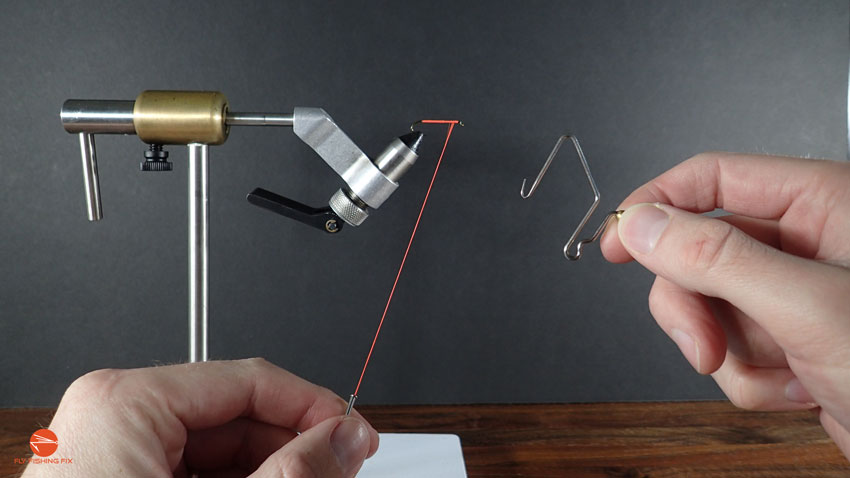
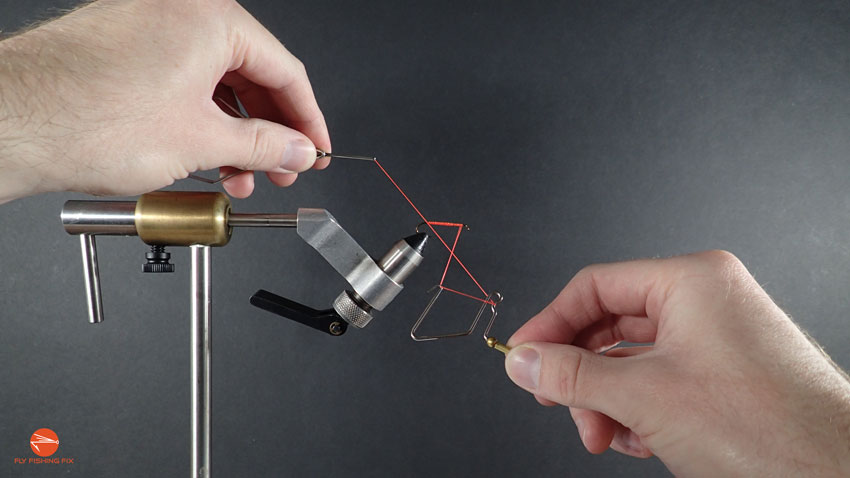
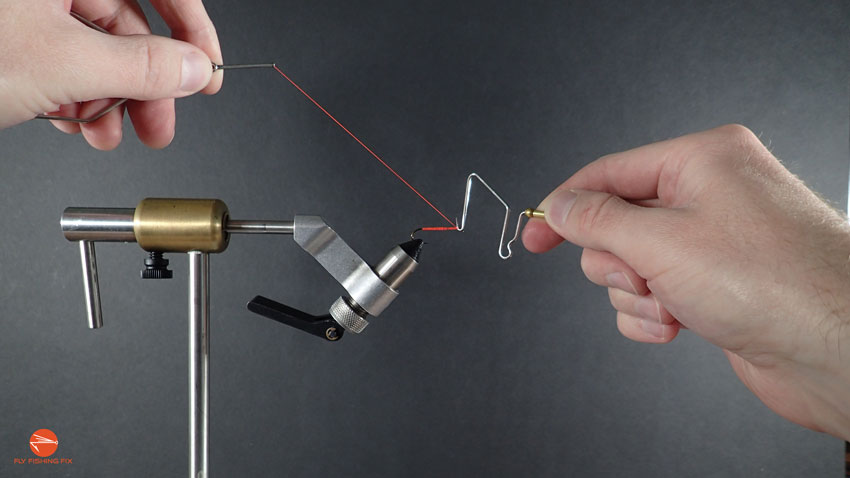
Step 3: With your non-dominant hand, pull the thread around the indentation in the arm of your Whip Finisher.
Step 4: Keeping your thread in both the hook and the indentation of your Whip Finisher, lift your bobbin up and back toward the bend of the hook in your vise.
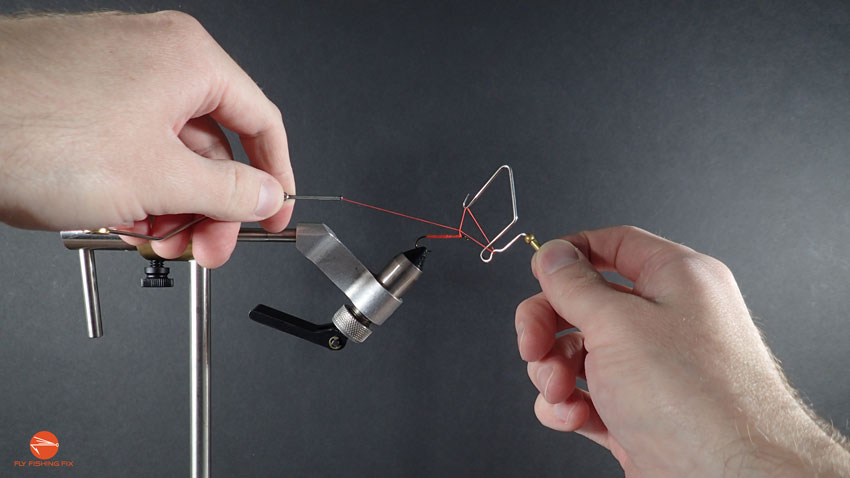
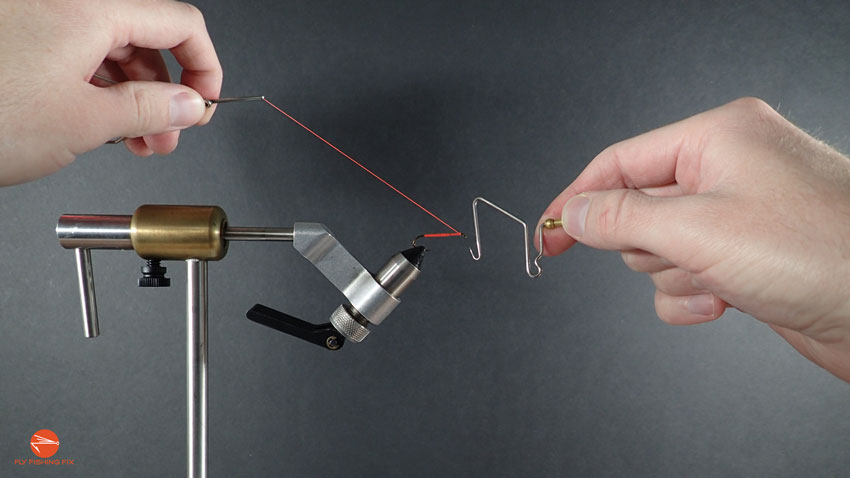
Step 5: Slide your thumb and index finger back down onto the handle of your Whip Finisher. This will allow the top section of the tool to spin.
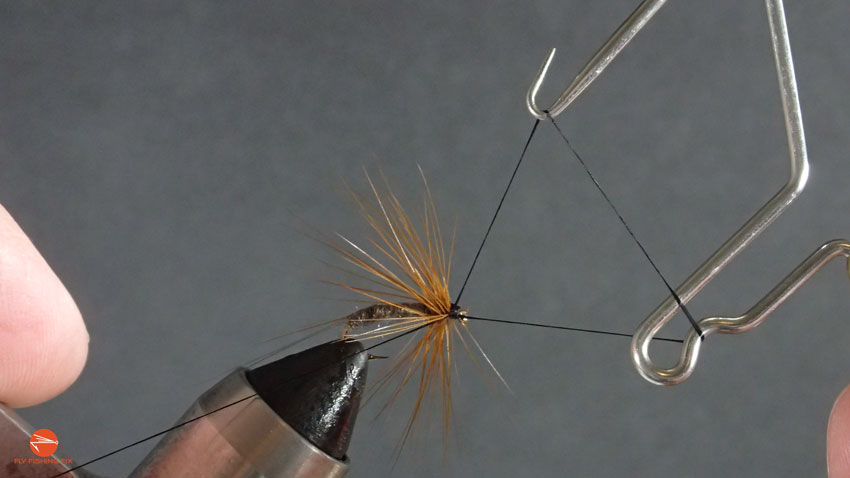
Step 6: While holding the bobbin above the bend of your hook, lift your whip finisher up above the fly, allowing it to spin freely. As you can see below, this will create a triangle with your thread. (This is the most difficult step of whip finishing, because your thread will want to slide off the indented portion of your Whip Finisher. Just take it slow, and use your non-dominant hand to hold your thread in place.)
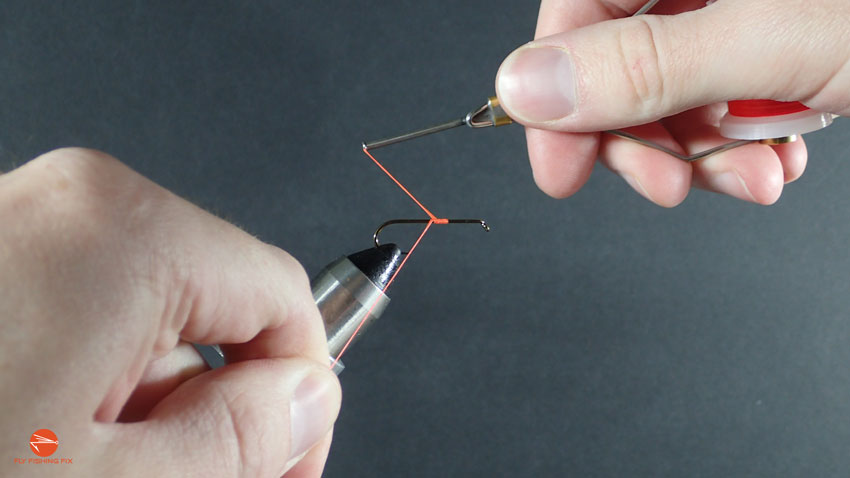
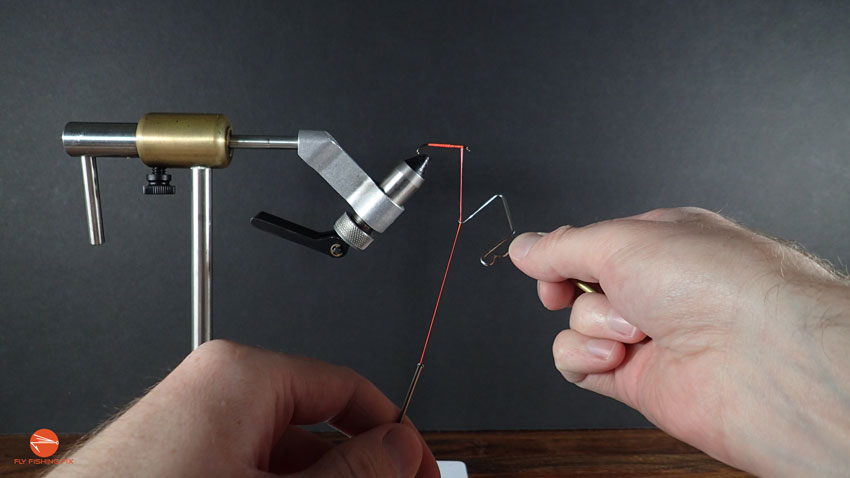
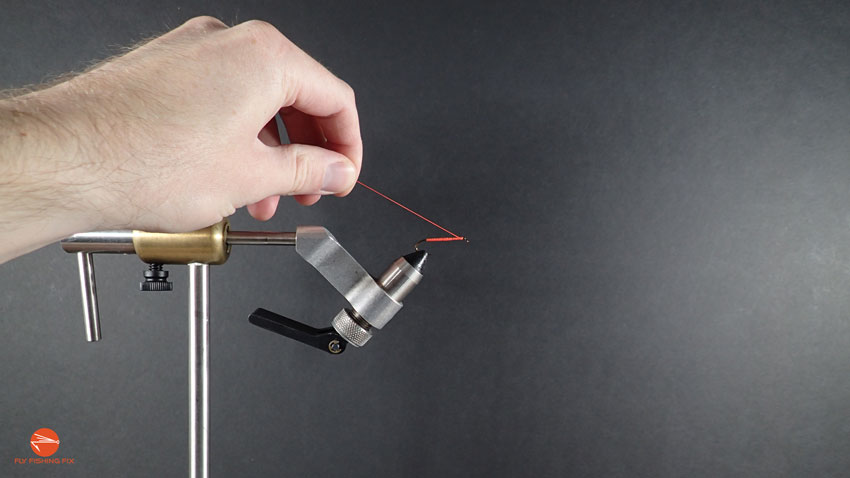
Step 7: Holding your bobbin in place, pass the eye of your hook through the triangle, and wrap the thread around the hook 3 to 5 times.
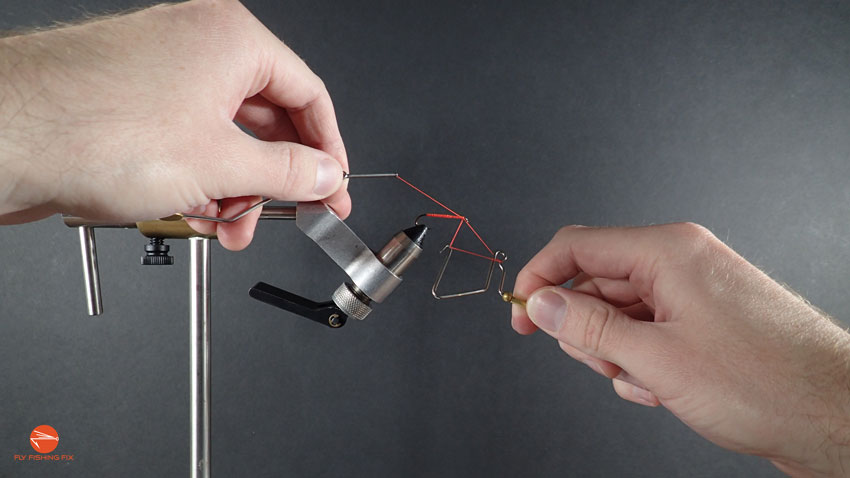
Step 8: Carefully — while continuing to allow the tool to spin — use the hook of the Whip Finisher upward, and free the thread from the indent. (At this point, your thread should still be attached to the hook of your Whip Finisher.)
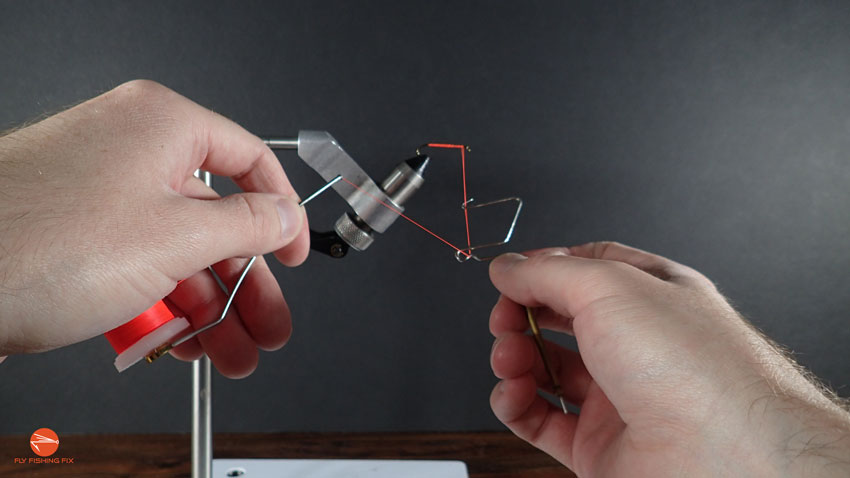
Step 9: Pull your bobbin toward your non-dominant side, and carefully lower the thread still held by your Whip Finisher until it reaches the shank of the hook.
Step 10: Pull the hook of your Whip Finisher out from the thread.

Step 11: Pull your bobbin to tighten the thread, and carefully cut your thread as close to the hook shank as possible.
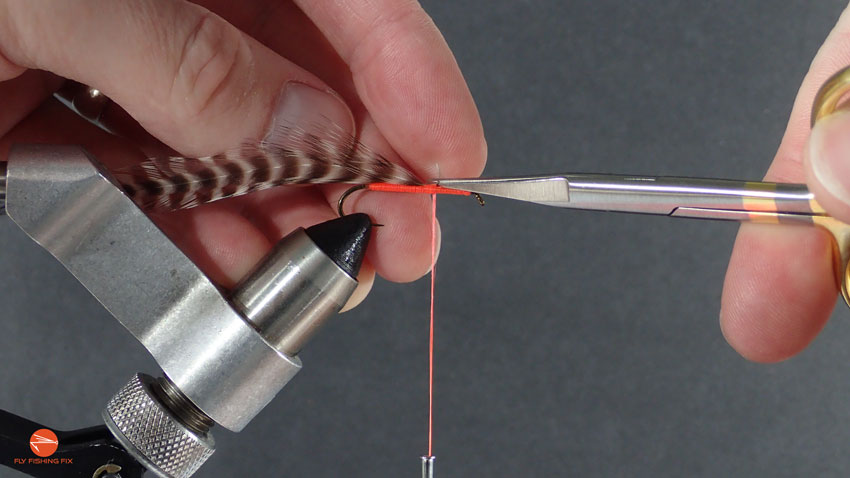
The Pinch Wrap
The pinch wrap is a technique used to hold (or “pinch”) a piece of material in place on your hook, while you wrap it with thread and thereby securing it to your fly. The difficulty of this technique really depends on the material you are trying to secure. To show you the process in the following guide, I will be using the Pinch Wrap technique to secure a piece of hackle to a hook.
Step 1: Hold the material with your non-dominant between the tip of your thumb and index finger.
Step 2: Pinch the material against the hook where you would like to secure it.
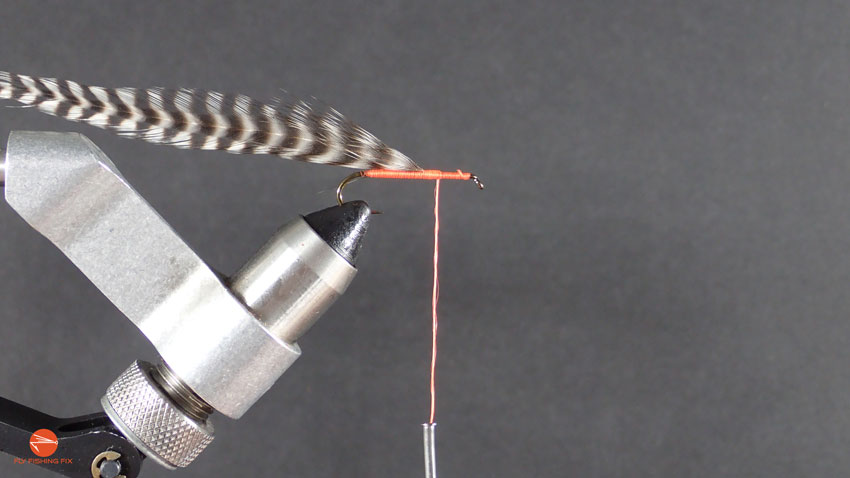
Step 3: While holding the material in place, loosely wrap your thread around the material as close to the tips of your fingers as possible.
Step 4: After one or two loose thread wraps, pull your thread tight, and make a few more tight wraps around the material.
Step 5: Let go of the material, making sure it stays in place, and cut away any extra material.
Step 6: Make a few final thread wraps to clean things up.
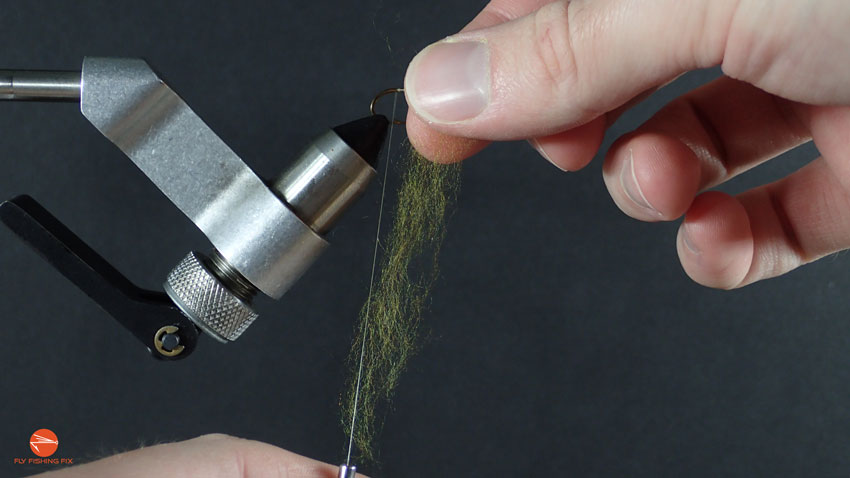
Applying Dubbing
I prefer to use waxed thread when tying flies, which makes applying dubbing a simple, two step process. I highly recommend you do the same, but if you want to use unwaxed, then you will just have to apply wax to your thread whenever you want to use dubbing in a fly pattern. You can buy dubbing wax at just about any fly shop that sells fly tying material.
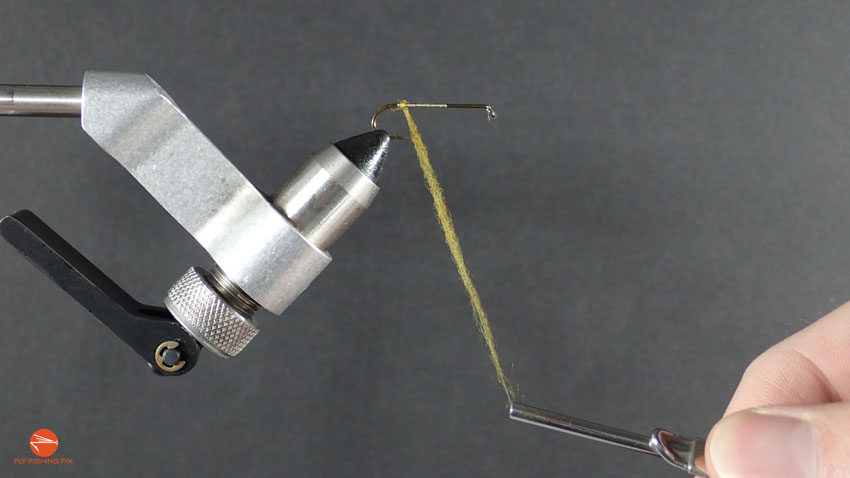
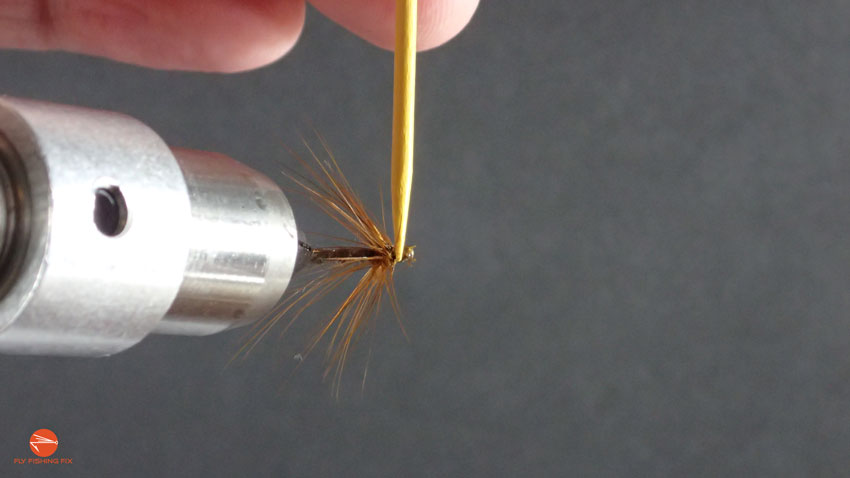
Step 1: The first step when applying dubbing is to use the proper amount. One of the biggest mistakes beginners make in fly tying, is that they use too much dubbing. When you apply dubbing, you should use just enough to cover the thread. Too much dubbing is a sure way to wreck just about any fly pattern. And the smaller the fly, the more important it is that you go easy. See the photo below to get a good idea of how little dubbing it actually takes to cover the thread.
Step 2: Twist the dubbing around your thread, and spread it out so for nice even coverage. Now, all you have to do is wrap your thread like normal.
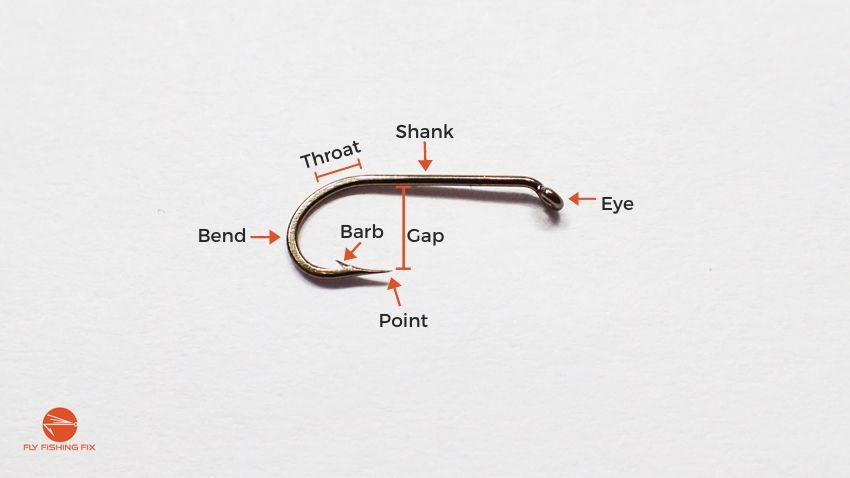
The Different Parts Of A Fish Hook
Before we get into tying some actual patterns, it is important that you understand the anatomy of a fish hook. I will be referencing the different parts of a hook a lot in the next section, so be sure to take a second to review the following diagram.
Tying Your First Flies: 3 Beginner Fly Patterns
Ok, we have finally arrived! If you’ve made it this far into this article, I have some mad respect for you. Up to this point, you have ordered all the tools and materials you need to get started, learned how to start your thread, whip finish a fly, and use the pinch wrap technique.
Now, it’s time to put those tools, materials and skills to the test. In this section, I am going to show you how to tie 3 different fly patterns: the San Juan Worm, the RS2, and a standard Mayfly.
I picked these three patterns, because they require a number of important techniques, without getting too advanced. So, without further ado, let’s tie some flies.
1. San Juan Worm
The San Juan Worm is the first fly pretty much every beginner learns to tie — and for good reason. First of all, it only requires three materials — a hook, thread, and ultra-chenille — which are all very easy to work with. Second of all, it employs all three techniques I walked you through earlier. Beyond that, this fly straight up catches fish. Which is the entire point, right?
SJW Fly Pattern Recipe
- 2X Heavy Nymph Hook Or Streamer Hook (Size 10 – 14)
- Waxed Thread (We will be using orange thread)
- Ultra-Chenille (We will be using brown chenille)
Step 1: Secure your hook in your device and start your thread wrap about half way up the hook shank.
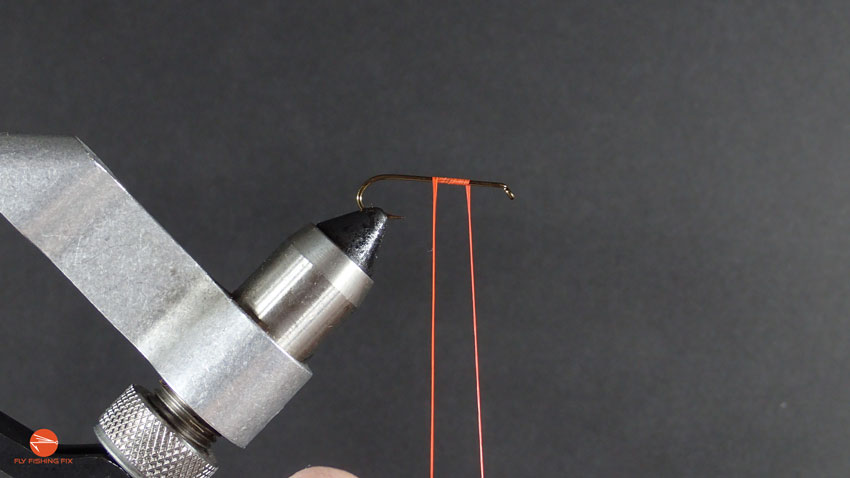
Step 2: Wrap your thread up toward the eye (leaving a small gap to be covered with your final whip finish). Now, wrap back over your thread, covering the entire hook shank with a nice, clean layer of thread.
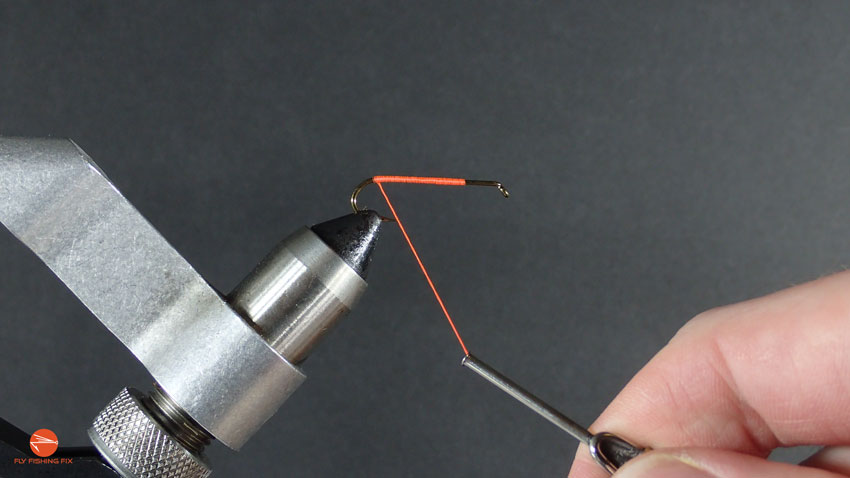
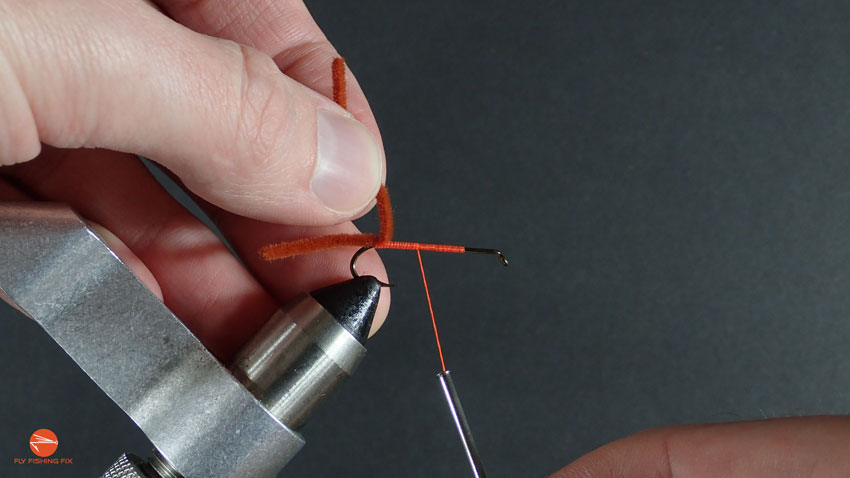
Step 3: With your thread wrapped all the way back to the bend of the hook, cut a piece of chenille about twice the length of your hook. Now, center it on your hook, and secure it at the back of the hook shank with one or two thread wraps using the pinch wrap technique.
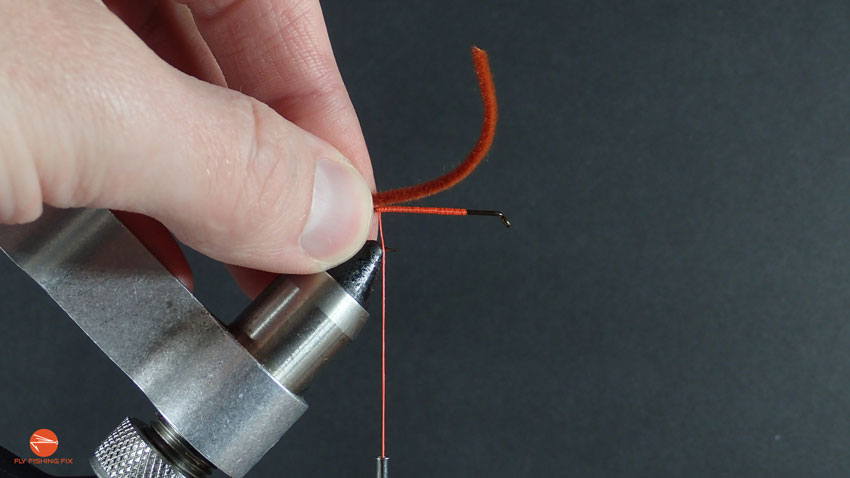
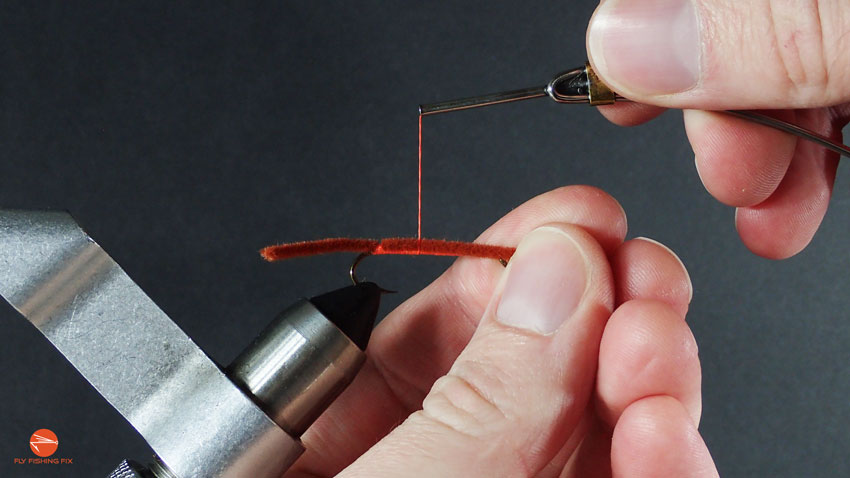
Step 4: With the chenille wrapped securely in place, lift it up, and wrap your thread about half-way up the hook shank.
Step 5: Lay the chenille back down, and secure it at the midpoint of the hook.
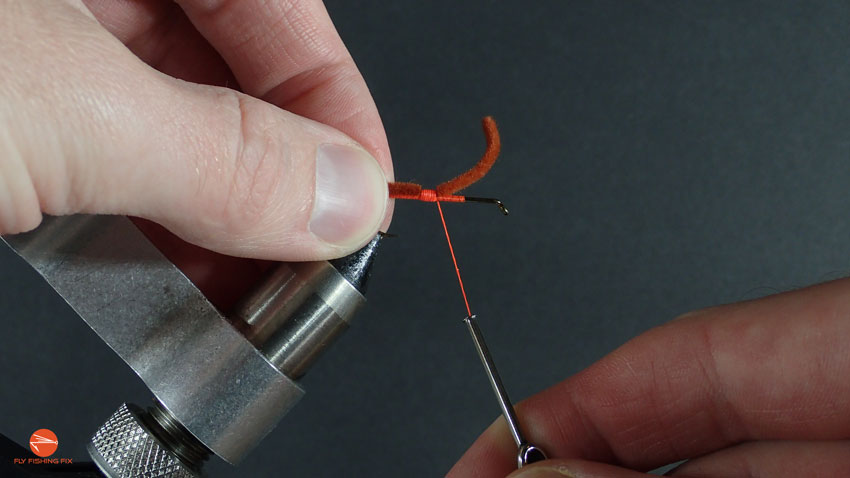
Step 6: Wrap your thread approximately 10 times over the chenille to imitate the Clitellum of a worm. You should neatly wrap back and forth over this section a few times to build it up.


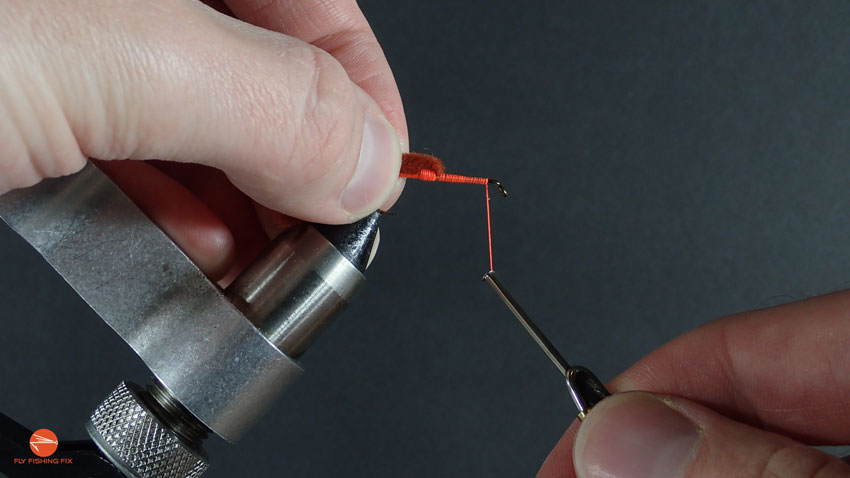
Step 7: Lift the remaining chenille up, and wrap your thread up to the eye of the hook.
Step 8: Lay the chenille back down, and secure it just behind the eye with two tight thread wraps.
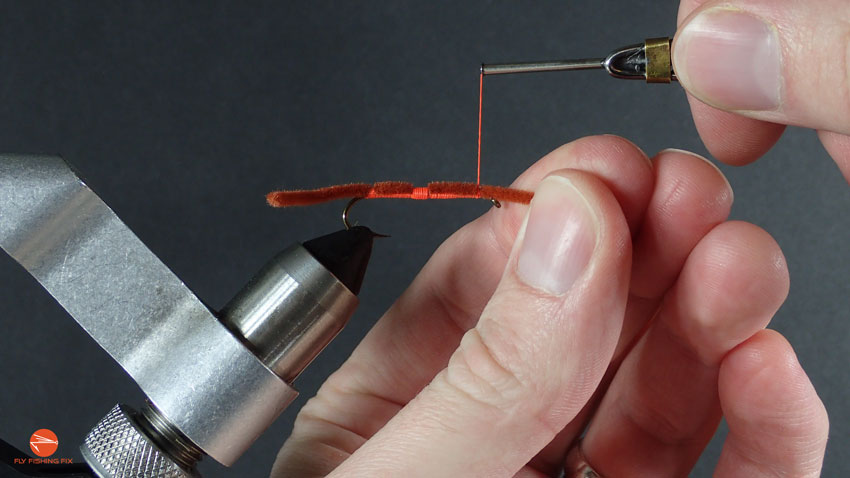
Step 9: Whip Finish your fly with 3 or 4 wraps. Be sure to feed the chenille that extends off the front of the fly through the thread triangle of your whip finish. This can be a little difficult at first, so try not to get frustrated. Just take your time.
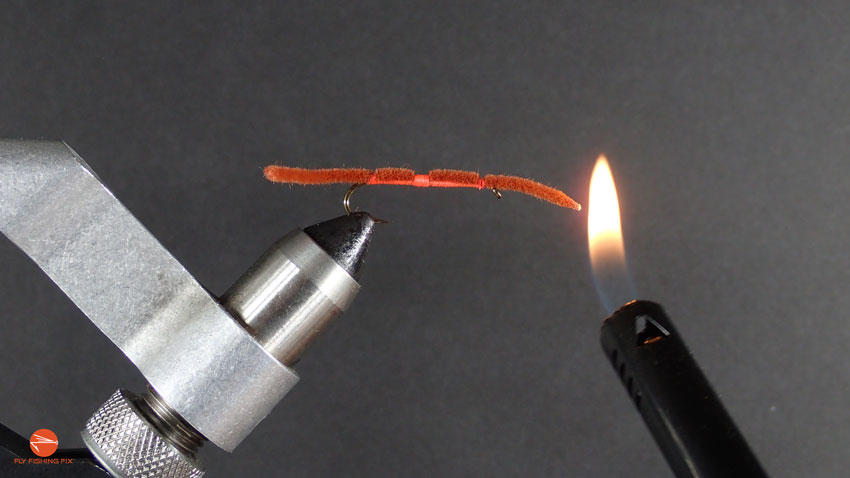
Step 10: Use a lighter to singe the front and back tips of the chenille. This will create the tapered look you would see on a professionally tied San Juan Worm.
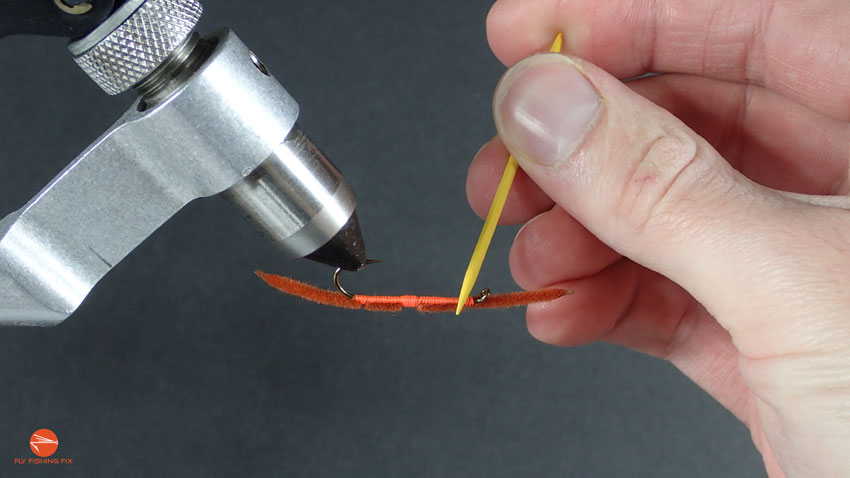
Step 11: Using a toothpick, carefully apply a drop of either head cement or super glue to your whip finish. This will reinforce your thread, and keep your fly from unraveling as easily. (If you would like, you can also turn your fly upside down using the rotary feature on your new vise, and apply a drop of head cement to the clitellum.)
2. RS2
I’m pretty sure I have caught more fish on an RS2 than just about any other fly. This pattern is an absolute essential in my fly fishing life. And here’s the best part, it’s pretty easy to tie. So, let’s get to it so that you can start stocking your fly box with this fish-catching little beauty!
RS2 Fly Pattern Recipe
- Nymph Hook (Size 16 – 24)
- Super-fine Dubbing (in Black, Olive, Tan, or Grey)
- 8/0 UNI-Thread (Black, Olive, Grey or Brown)
- Microfibetts (White or Black)
- CDC Puffs (White)
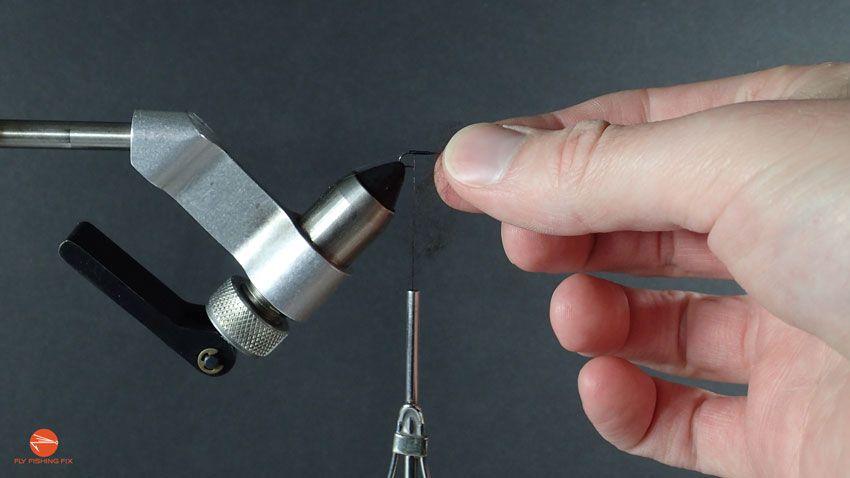
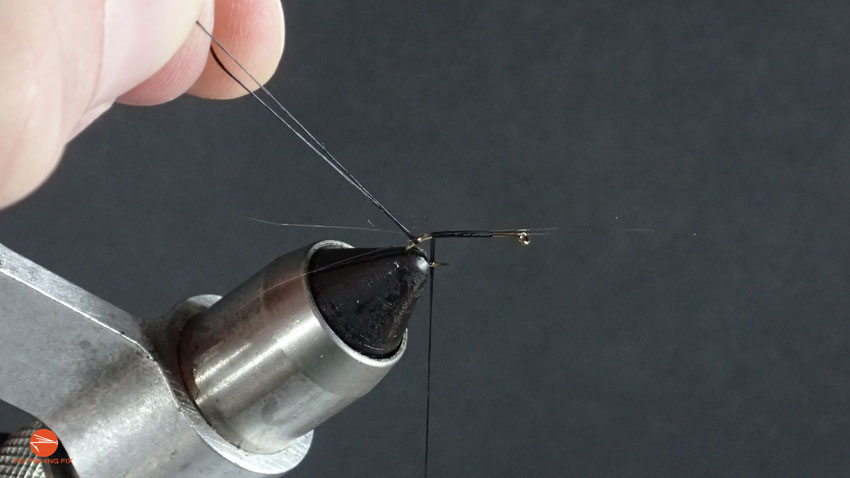
Step 1: Secure your hook in your vise so that just the tip of the hook is exposed.

Step 2: Start your thread near the eye of the hook, leaving a small gap between your thread and the eye. Then, wrap your thread back to the midpoint of the hook shank, and trim the tag end of the thread. (Be sure to keep the trimmed thread handy, because we will be using this later on.)
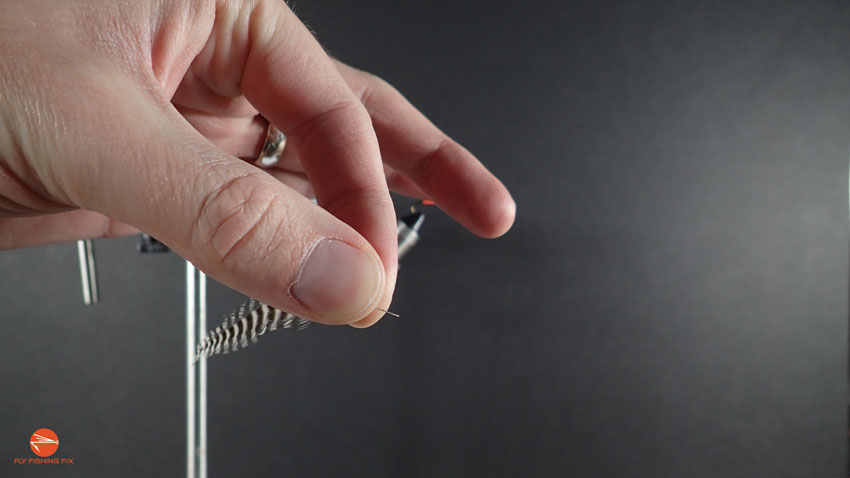
Step 3: Trim 2 microfibetts from your microfibett clump. Starting from the midway point on the hook shank, use the pinch wrap technique to secure them so that the pointed ends extend a full hook-length off the back of the hook. Make sure the microfibetts are even at the ends, and sitting on top of the hook shank.
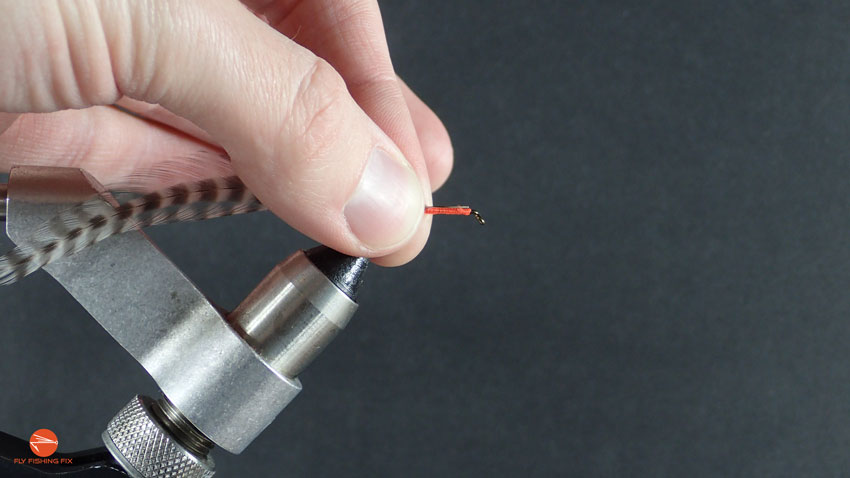
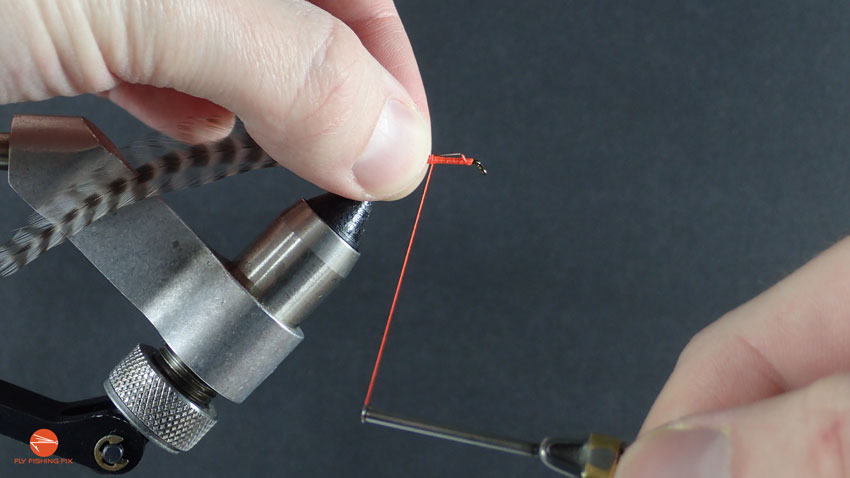
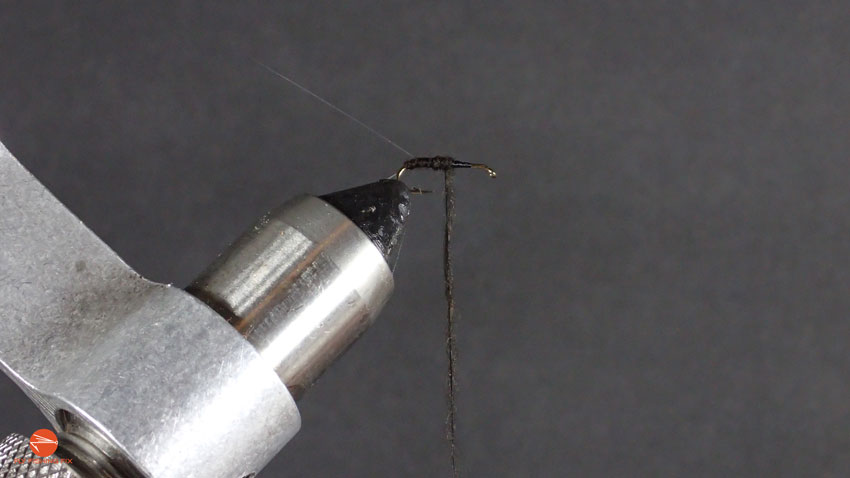
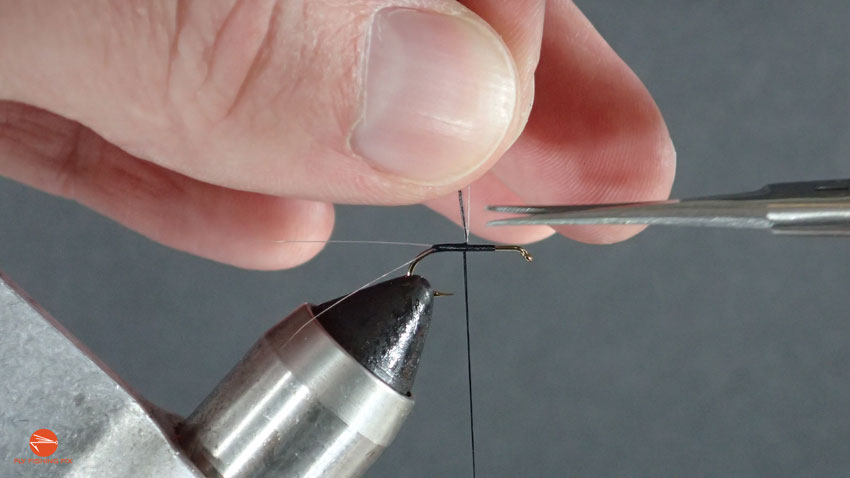
Step 4: Take the tag end of the thread you trimmed from the fly when you first started your thread, and wrap it around the hook so that the tail ends of it extend back behind the fly. Now, using your bodkin needle, separate the microfibetts from one another, pull the two ends of your thread up between them until the microfibetts splay out approximately 45 degrees, and secure the loose thread to the hook shank with 3 or 4 thread wraps.

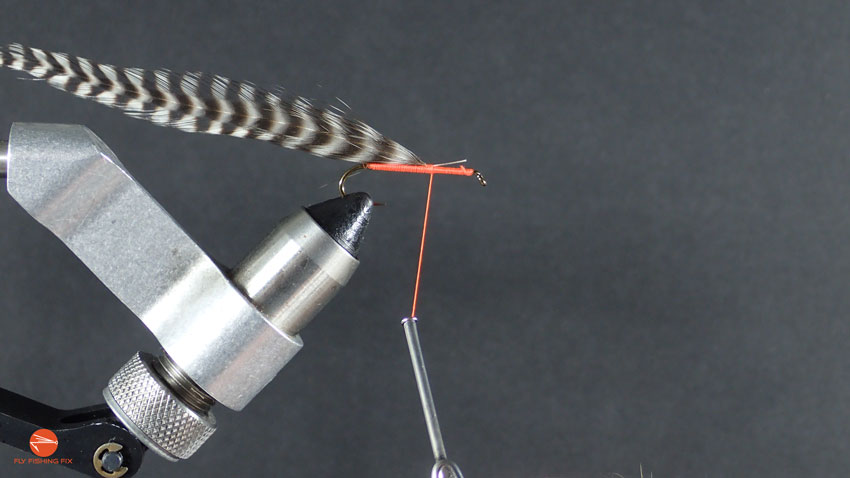
Step 5: Wrap your thread up to the midway point of the shank, and trim off the tag ends of the thread and microfibetts.
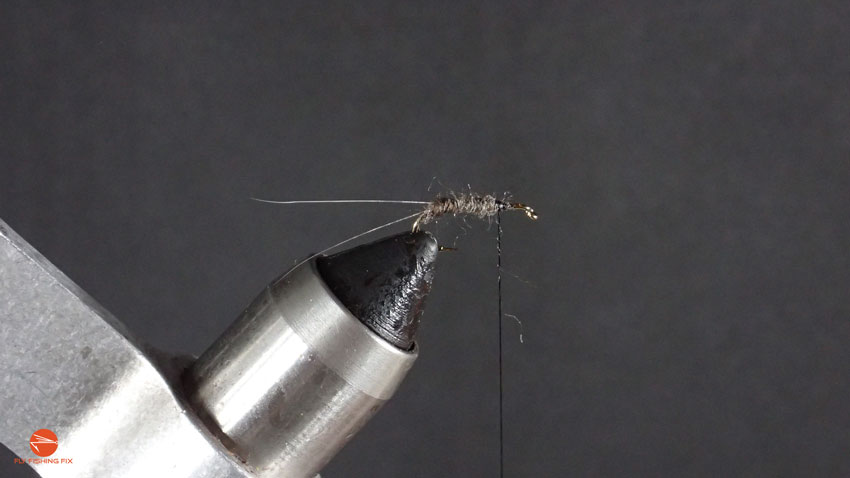
Step 6: Make a couple wraps over the loose ends of your thread and microfibetts to clean things up a bit.
Step 7: Wrap your thread back to the throat of the hook and apply some dubbing. The most common RS2s incorporate black, olive or grey dubbing, but you can use whatever color dubbing you like. Just remember, to go easy on the dubbing. If you use too much, your fly will be bulky, and messy.
Step 8: Make a couple wraps behind your microfibetts to lift them upwards, and then continue to wrap your thread about halfway up the hook shank, and stop. You can temporarily remove the remaining dubbing from your thread if you would like.
Step 9: Pinch wrap half a CDC Puff, or any kind of down feathers you have to the top of your fly pattern. This will imitate the wing buds of your emerger. Wrap your thread four or five times to secure the CDC in place on top of the hook.
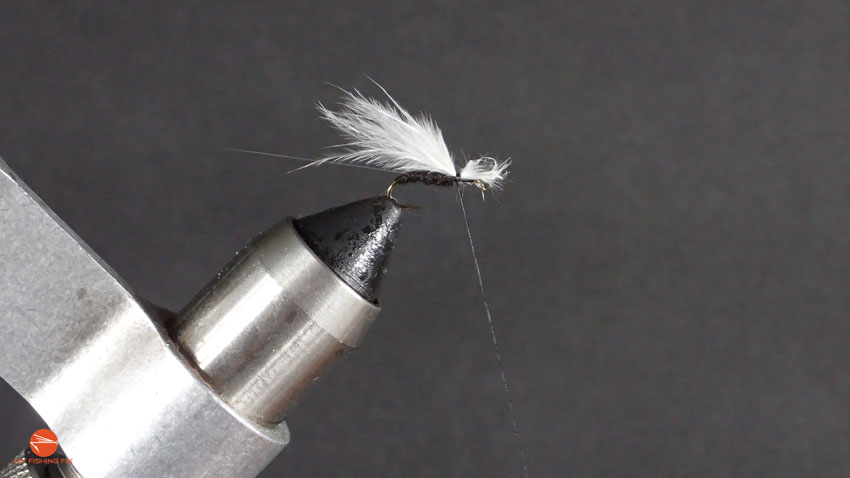
Step 10: Re-apply some dubbing to your thread.
Step 11: Wrap your thread with dubbing around the base of the CDC. Be sure to stack a couple layers of thread behind the CDC so that it sits perpendicular to your hook. Then, continue your wraps forward leaving a small gap behind the eye.
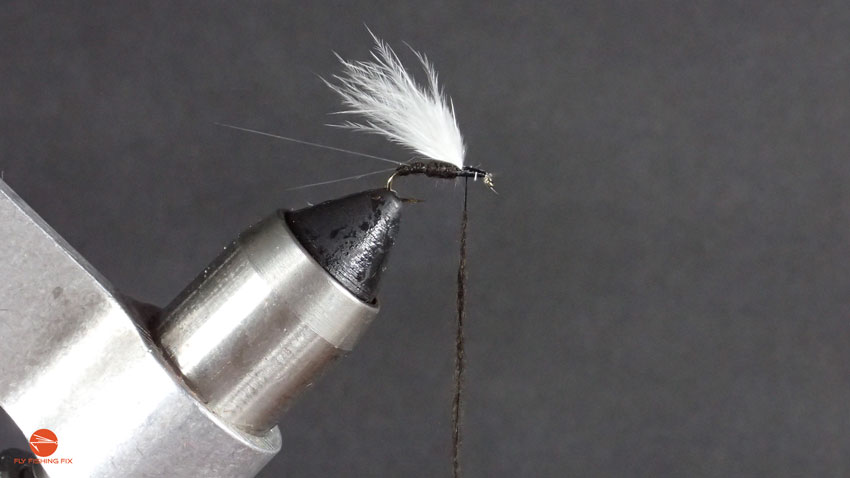
Step 12: Remove any remaining dubbing, and add a few final thread wraps to create the head of the fly.
Step 13: Whip finish your RS2 with about 3-4 wraps, and cut your thread.

Step 14: Holding the wings of your RS2 vertical, trim it at a steep downward angle. As a rule of thumb, the wings should be about the same length as your hook.
Step 15: Use your rotary vise to turn your RS2 upside down. Now, using a bodkin needle or toothpick, carefully apply a small amount of head cement to the front threads. This will secure your whip finish, and help your fly to last a lot longer.
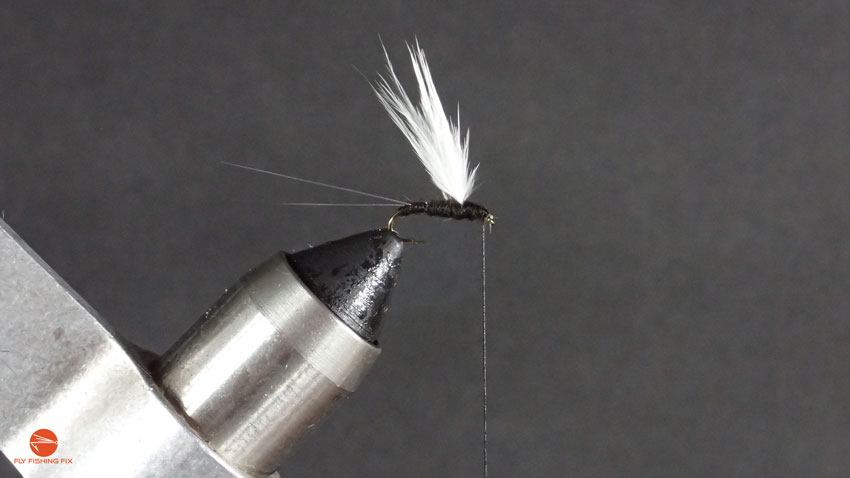
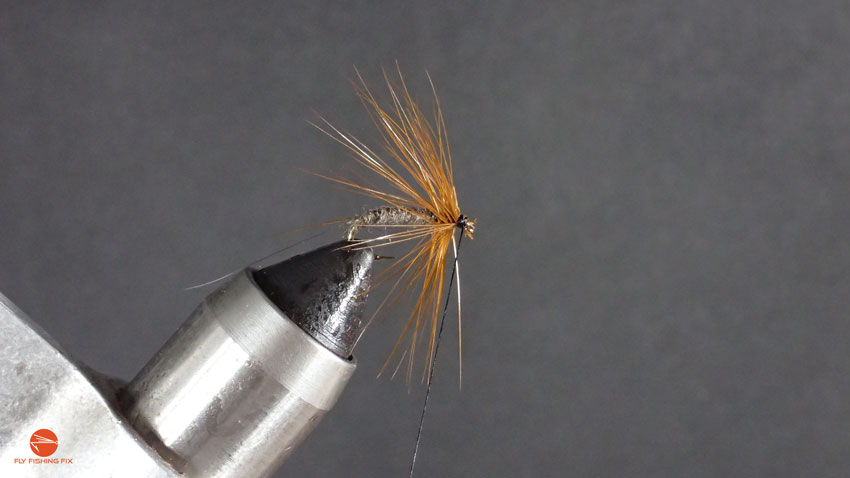
3. Soft Hackle Mayfly
This basic Soft Hackle Mayfly is a great beginner fly pattern. It catches a lot of fish, and allows you to practice a number of fly tying techniques. As you might suspect, in this fly pattern, we will be adding hackle, which is a slightly more advanced technique than we have covered so far. Just follow along, and take your time.
Soft Hackle Mayfly Fly Pattern Recipe
- Dry Fly Hook (Size 16 – 24)
- Super-fine Dubbing (in cream, olive, yellow or tan)
- 8/0 UNI-Thread (Cream, Olive, Grey, Brown or Tan)
- Microfibetts (White or Black)
- Hackle (Black, Grey, White or Brown)
Step 1: Secure your hook in your vise so that the point of your hook is exposed.
Step 2: Start your thread about half way up the hook shank. Make a few wraps up toward the eye, and then wrap back over your thread slightly past your starting point.
Step 3: Trim your excess thread, and set it aside for future use.
Step 4: With your thread sitting just behind the midpoint on your hook shank, trim off two microfibetts from your microfibett clump, and secure them to the top of your hook so that they extend at least a full hook-length back from the bend of the hook. Be sure the tips are nice and aligned. Now, wrap your thread cleanly to the back of the hook shank.
Step 5: Wrap the excess thread you trimmed off from your initial thread wraps around the bend of the hook so that the ends extend backwards. Using your bodkin needle, separate the microfibetts from one another, and pull the two ends of your thread up between them. Now, secure these thread ends with a few tight wraps.
Step 6: Continue your thread wraps up to the midpoint of the hook shank, and trim the ends of the excess thread and microfibetts. Cover any exposed ends of the microfibetts with a few clean thread wraps.
Step 7: Wrap your thread back to the tail of the fly pattern, and apply a light amount of dubbing to your thread. Make a couple wraps behind the microfibetts to lift them upwards, and then continue to wrap your dubbed thread up toward the eye until it is just past the midpoint on the hook shank.
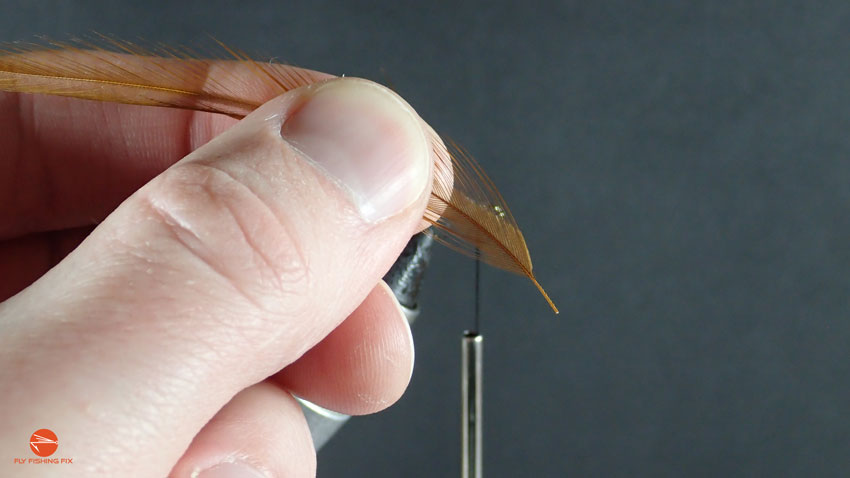
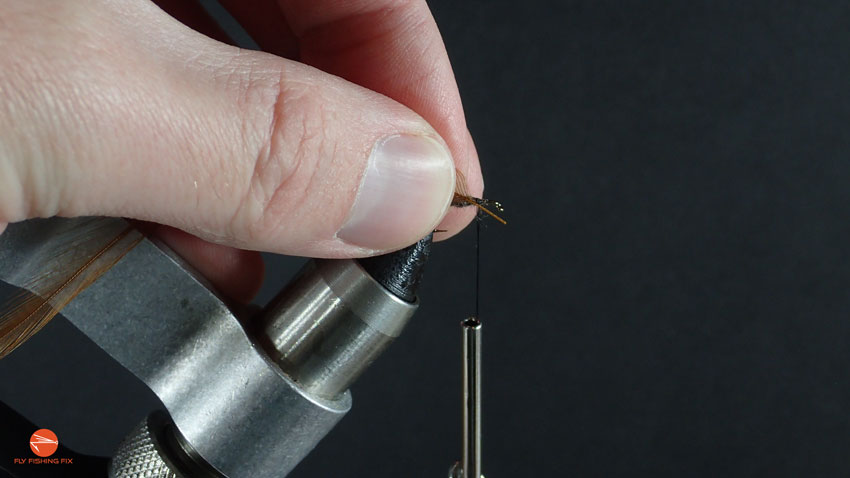
Step 8: Select a hackle feather of your choice, and strip the barbs from the bottom of the feather. (This will be the portion of the feather you initially secure to your hook.)
Step 9: Using the pinch wrap technique, secure your hackle feather directly up against the dubbing body of your fly pattern. Now, wrap your thread up toward the eye of the hook, leaving a small gap for your final wraps and whip finish.
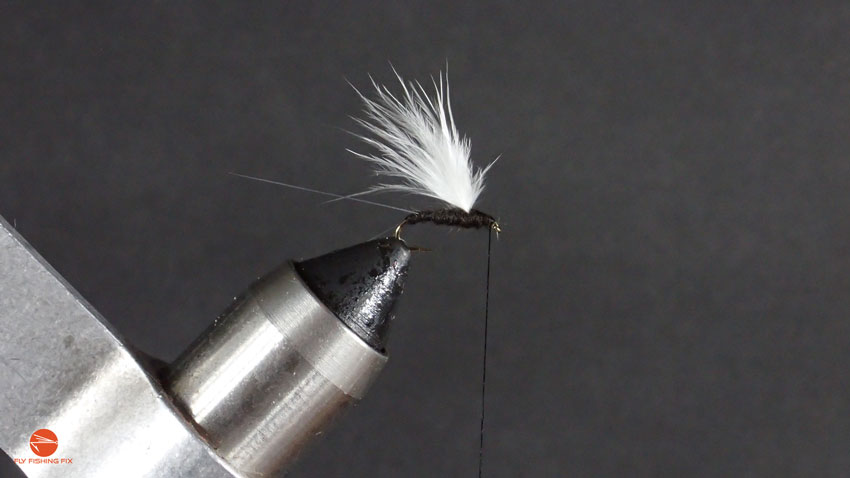
Step 10: Carefully wrap your hackle — butting each successive wrap against the previous wrap — up toward the eye. If you need to, you can grip the feather with your hackle pliers.
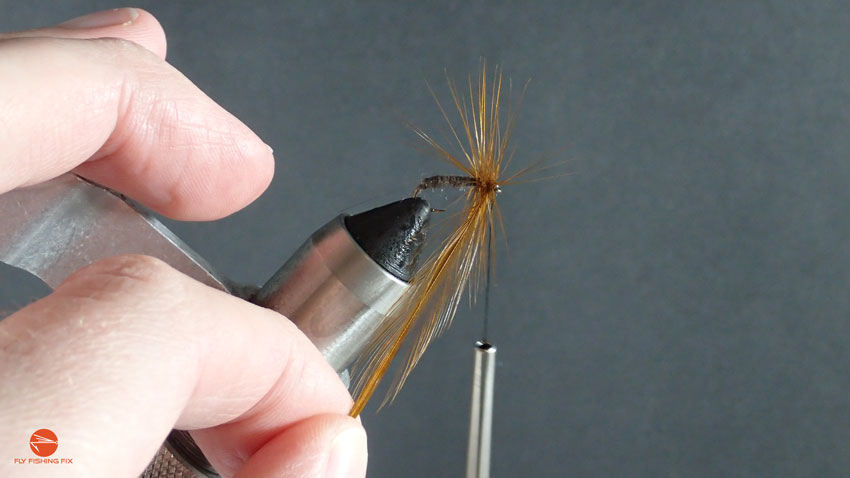
Step 11: Secure your hackle about an eye-length back from the eye with 4 – 5 tight thread wraps.
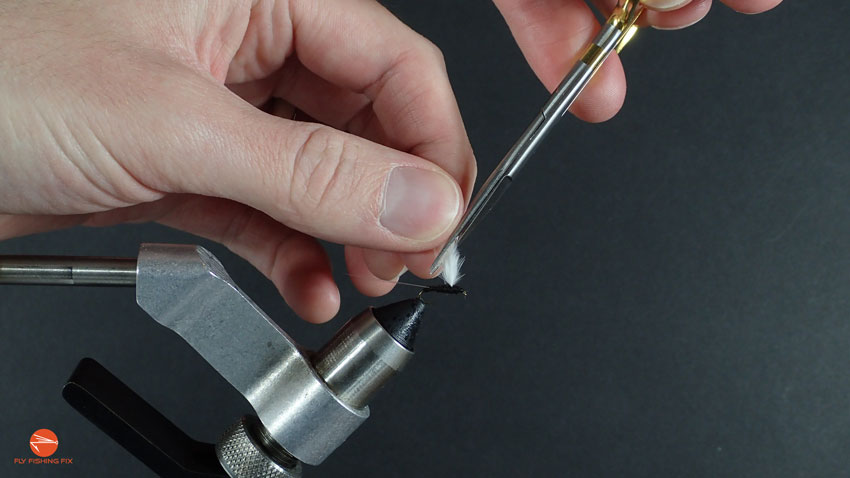
Step 12: Carefully trim the excess hackle, making sure you don’t trim any of the other hackle fibers.
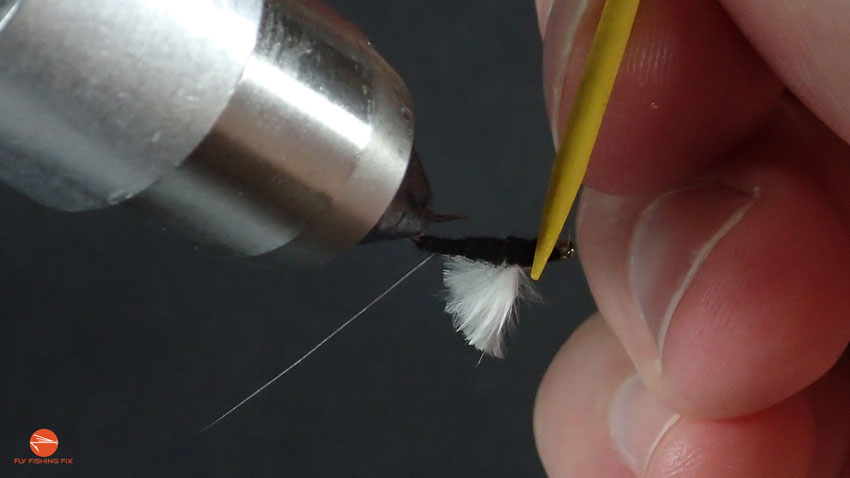
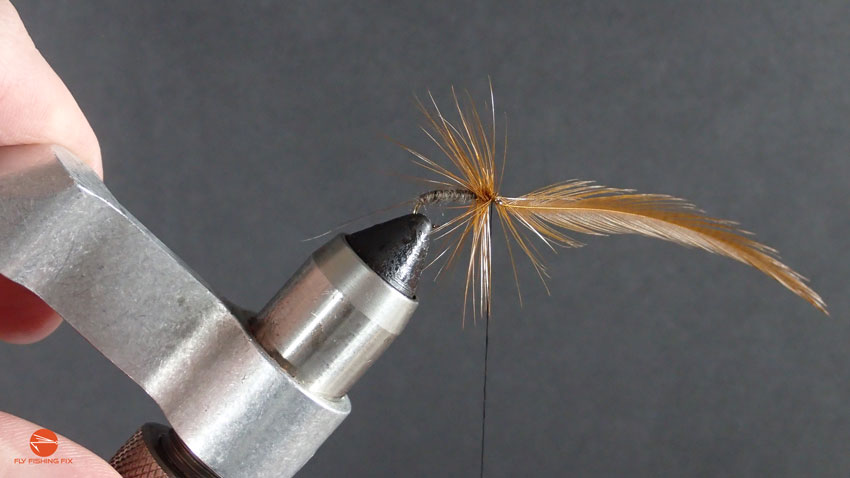
Step 13: Whip finish your fly with 3 – 4 wraps.
Step 14: Using your rotary vise, turn the fly over and carefully apply a drop of head cement to your whip finish. (Make sure you don’t get any head cement on the hackle fibers.)
Fly Tying For Beginners: Summary
In this article, we covered the essential tools, materials and techniques, to get you started in fly tying. Beyond that, we walked through the step-by-step tying process for three different fly patterns.
If you are a beginner fly-tyer, and you feel like anything was missing from this guide, be sure to comment below and let me know. I want this guide to be as helpful as possible, so don’t hesitate to reach out with further questions.
In the meantime, I’ll finish with this: fly tying is a great way to pass the time when you don’t have the opportunity to get out on the water. And I’ll be honest, few things are more satisfying than catching a fish on a fly you tied. I just hope this article helps you experience that satisfaction.