As a fly fishing angler, becoming proficient at the art of nymphing is an essential step toward catching more and bigger fish. If you’ve learned how to nymph with one fly, it’s time to double your chances of success by adding another. But, how do you set up a double nymph rig?
The best way to set up a double nymph rig is to first tie a second section of equal or lighter test tippet to the hook bend of the upper nymph. Then, tie your second, usually smaller nymph, to the trailing end, just as you would your first fly. Additionally, when adding a second nymph, many anglers choose to add weight above their first fly.
The double nymph setup is a go-to rig for most anglers. In your developing repertoire of fly fishing knowledge and techniques, you will definitely want to know how to set up different types of double nymph rigs. This will help you adjust to and accommodate different situations while still improving your chances of catching fish with a two-fly rig.
In this post, we offer a step-by-step guide on how to set up a standard double nymph rig while giving you some interesting variations you will probably want to try.
Disclaimer: This post may contain affiliate links, meaning we will receive a small commission (at no cost to you) if you click through and make a purchase.Choosing The Right Fly Line, Leader And Tippet For A Double Nymph Rig
Just as it is with about everything in this sport, conditions determine setup. For instance, the double nymph rig (line, leader, tippet flies, weights and strike indication) you’ll use on a small Colorado mountain stream with low, gin-clear water and leader-shy trout will differ vastly from how you’d need to setup your rig for a large, high-volume Wyoming river just after runoff.
So, to give us a place to start, let’s go middle-of-the-road and assume we’re going to nymph fish a medium sized river at its average flow (CFS) in the early summer. It’s still running fairly deep — between, say, two and five feet — and, though clearing, is still a tad off color. The fish are hungry, less selective and not as leader-shy as they might be later in the year.

Let’s further assume that the only rod you have at your avail is the standard 9 foot, 5 weight rod you bought from a sales guy who told you that it was probably the most commonly used and versatile rod you could buy. If you bought your gear at a decent fly shop, that rod is undoubtedly equipped with an appropriately weighted reel and that reel has been correctly spooled with standard 5 weight, weight-forward line. From there, here is how you should setup your double nymph rig.
Related Content:
- 25 Tips For Fly Fishing Small Streams And Creeks
- 9 Killer Nymphing Tips For Beginners
- How Often Should You Clean Your Fly Line?
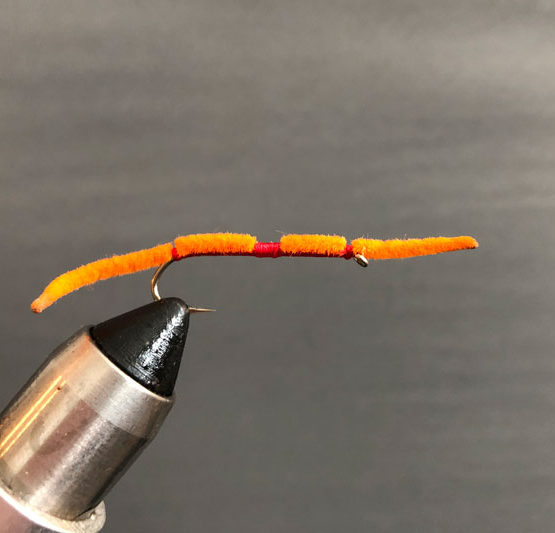
- San Juan Worm: Fly Pattern Profile
- How Much Should You Tip A Fishing Guide?
- Fly Tying For Beginners (The Ultimate Guide)
How To Set Up A Double Nymph Rig
Step 1 – Tie Your Leader To Your Fly Line
Most new fly lines — the colored line spooled on your reel — come with a small loop at their forward end. Once you’ve attached your reel and have fed your line through every guide on your rod (for some reason, it’s strangely easy to miss one), you will connect your leader to your fly line.
Leader selection is very important. A tapered, knotless leader is the best kind of leader for many fly fishing situations. You’ll want to be well stocked with several in different lengths and tests. The leader you select will depend upon a few things:
- How leader-shy the trout are known to be at this time of year
- How big the fish run in this river
- How much fight they’re known to put up and
- The general depth of the runs you’ll be fishing
Assuming the trout in our scenario are known to be big and feisty, and since the water is still a little off color, we can and should lean toward a stronger leader. Given my assessment of this river, I’d probably go with a 7 foot 3X or 4X leader here. Additional leader considerations can be overwhelming, but the most basic is whether or not you opt to use standard nylon monofilament or fluorocarbon.
There are many differences in the two but, since fluorocarbon sinks faster, is less visible to fish, and tends to be more resistant to abrasions, fluorocarbon leaders and tippet are better suited for nymph rig setups. (For sheer durability, greater fluorocarbon flexibility, reliability and overall consistent performance, my favorite nymphing leader and tippet brand and type is Rio – Fluoroflex.)
Leaders also come with a pre-tied loop on one end. If both leader and line feature loops, the easiest connection is a loop-to-loop (a.k.a. Handshake) Knot.

With the idea of having a lower profile knot at the line-to-leader connection, some purists will cut off both line and leader loops and connect the two with a Nail Knot. Of course that’s up to you but, over the years, I have been perfectly satisfied with the quick-and-easy Handshake Knot.
That said, knowing how to tie a sleek Nail Knot comes in very handy if, for whatever reason, your line and leader have lost their loops.
Step 2 – Connect Your First Section Of Tippet To Your Leader
Now that your line and leader are connected, it’s time to add a section of tippet to your leader.
Tippet serves several functions. Among them, and the most important, is to present your fly to the fish you are trying to catch in a way that looks as natural to them as possible. Trust me, fish are very good at not taking a fly that they see is connected to a string. Fluorocarbon tippet is all but invisible to them and, assuming you’ve selected the right tippet type and test for the situation, it will simply help you catch more fish.
A secondary benefit is that tippet — sold in long spools — extends the length of, and protects your comparatively expensive leader.
Additionally, a third benefit, just above the tippet-to-leader knot is a great location to add weights so that they don’t slide down toward your flies with repeated casting.

Generally speaking, when setting up a nymph rig, you’ll want your rig to taper down from the much thicker line-leader connection to final fly.
In our scenario, for example, you’d start with the tapered, knotless 3X leader, connect it to a section of 4X tippet to first fly and finish with a 5X section of tippet to your second fly. That said, it’s also common to not taper or to vary your taper.
For instance, you could go with more of a level rig: 3X leader to 3X tippet to 3X tippet, or taper only the last section: 3X leader to 3X tippet to 4X tippet. It’s not a good idea not to taper, so you wouldn’t go with 3X leader to 2X tippet and back to 3X tippet. Holding to a tapering methodology will, while reducing tangles, produce better casts and more natural drifts.
The leader-to-tippet connection is usually accomplished with an easy-to-tie Double Surgeon’s knot, however, a very useful tip I learned from one of my favorite guides was to consider tying in a standard swivel — yes, the same kind you’d use in a spin-casting lure situation — between your leader-to-first tippet section connection. I have been inclined to employ a swivel on larger, deeper flowing rivers on which I’m fishing double, and triple-nymph rigs.
The guide who put me on to this tip theorized that a #7 gold swivel at the leader-tippet junction of an otherwise standard nymph rig setup acts as a rig-strengthener, a weight, an attractor and as a tangle minimizer.
It also allows for a more natural drift of the set of flies below it. Revelling in the parade of trout we landed that day, I became an ardent believer in this little tip, and have always carried a supply of #7 swivels since. They come in both gold and black. I’ll use the black ones when I believe the fish to be more leader shy.
If you decide to insert a swivel between leader and tippet, a standard Clinch Knot at both ends of the swivel (leader side and tippet side) makes for a very strong connection.

The length of your first tippet section will vary a bit by situation, such as river depth, but for the sake of a natural drift depth between weights and fly, your first tippet section will typically not exceed 12 inches. Any longer than that can cause your fly to drift at a shallower depth than your weight (if you’re using weight) and that is not desirable.
By the way, and maybe I should have stated this a little earlier, use good nippers to trim down the tag ends of all knots. Sloppy, poorly-trimmed knots will repel fish. That said, it’s always a good idea to leave a very short tag end on your knots. This little tip will help to keep knots from unravelling when a heavy fish pulls them all a little more taut than you could get them.
Step 3 – Add Your First Fly
In keeping with the idea of tapering, the first fly in a standard double nymph rig is usually the larger and heavier of the two flies.
Let’s say, in our scenario, I want to use a size 14 golden stonefly and a smaller size 18 baetis nymph. I would make the golden stone my upper (closer to leader) bug and, thus, tie it on first. Although there are several ways to tie flies to tippet, the most common is the Clinch Knot or the slightly stronger version, the aptly-named, “Improved Clinch Knot”. There are other tippet-to-fly knot variations but this is the most commonly used.
And at this point, it’s important that we discuss what I believe to be among the best little inventions known to fly fishers… the Ty-Rite tool. Simply put, this little gem makes tying a fly to a section of tippet about as easy and quick as tying your shoes. Our only lament is that the Ty-Rite tool only comes in Junior and Senior versions. Since the Junior version isn’t small enough for really small flies (size 20 or smaller), we would love it if they came out with a Junior-Junior version. You’re welcome, Ty-Rite. Please forward all royalty checks to Fly Fishing Fix.
Step 4 – Connect Your Second Section Of Tippet
When setting up a double nymph rig, most fly anglers will tie the second tippet section to the hook bend of the first nymph with a standard or Improved Clinch Knot. Again, the length of the second tippet section will vary by situation but, since getting both nymphs down as close to river bottom is desirable, and, since your upper nymph also acts like a weight to your second nymph, it’s a good rule of thumb to keep your second section of tippet similar in length to the first.
Tying your second section of tippet to the hook bend of the upper fly can be a little tricky. Since you’re not feeding the tippet through an eyelet, the first loop you make can come off the hook during the tying process. It helps to keep your tippet somewhat taut while tying but, with practice, you’ll get the hang of it.


Step 5 – Attach Your Second Fly
This one is easy. Just as you did with your upper fly, tie your second nymph to the end of the second section of tippet, trim your knot and, voila, your double nymph rig is nearly complete. At this stage, I like to pinch the leader-to-tippet connection between thumb and forefinger of my left hand, then, while being careful not to crush its hackle, pinch the last nymph between thumb and forefinger of my right hand, and give the whole rig a gentle but firm tug, just to make sure everything is straight and tight.
Step 6 – Add Weights
As discussed earlier in this article, if needed, the best place to add weight is just above the leader-to-first-tippet junction where the knot acts as a barrier. This will keep your weights in place as you cast.
Weight comes in a variety of types, from lead split-shot to sink putty. In most cases, we prefer removable split-shot. It’s inexpensive, comes in several sizes and features a pair of flanges that makes it easy to add and remove (and reuse) as needed.
One additional note on weights. Depending upon depth and swiftness of river flow, nymphs tied with tungsten beads may help your flies get down fast enough to preclude the need for additional weight. If the river you’re fishing is deep and fast, you may want to employ both tungsten weighted flies and weights, but, in this case, minimize unnecessary casting motion when hurling these heavier rigs; they are a gnarl waiting to happen. Stick with tension roll cast techniques.
Step 7 – Attach A Strike Indicator
Since your nymphs will be drifting and drawing strikes under the water’s surface, you’re probably going to want to know when a fish has eaten your offering. Although it can be fun and more challenging to fish a nymph rig without a strike indicator (“naked nymphing”), most standard nymph setups include one.
As with most fly fishing tools and gadgets, strike indicators come in a wide variety of types, mechanisms, sizes, colors and more. Some are more suited for stealth while others are perfectly acceptable in faster-moving, deeper, murkier conditions, as is the case in this post’s example scenario.
For such a situation, we prefer to use the Thingamabobber as our strike indicator and, since they’re basically small, water-tight balloons that sit high in the water, as an aid to greater depth control and more sensitive and obvious strike indication.
A good starting rule of thumb is to attach your strike indicator about two-thirds of the way up your leader. The idea is to position your strike indicator so that it isn’t too close to your rig (and, therefore, sinking with it) but to keep it just high enough on your leader to:
- Allow plenty of room for your nymphs to sink to or near the river’s bottom
- Not be so high that there’s too much lag in your line between strike and clear indication
In other words, if your bulb indicator is too close to your set of flies, it will cause them to ride higher in the current than you want them to and your indicator will be more apt to sink and, thus, be less visible. And if it’s too far away from your fly set, you will tend to be late in your set (not good) and or miss strikes altogether (even worse).
Catch Lots Of Fish With Your New Double Nymph Rig!
Now that you’re all dialed in with a double nymph rig, cast away, have fun, and catch tons more fish! As an added bonus, now you’ll know what those fly fishing freaks are talking about at neighborhood barbeques!
Bottom Line
One of the most alluring attributes of fly fishing is that it involves a lot of experimentation. Although, in this post, I’ve described how to setup a standard double nymph rig, the fun of it is using this configuration to test more and different fly combinations, rig lengths, drift depths, and more.
As always, we invite your tips and comments and encourage you to sign up below to receive new posts and recommendations directly in your inbox.
We have big plans and want you along for the float.
Join Fly Fishing Fix, Today!